
When faced with the every growing pressure of meeting common core standards in literacy, how can teachers introduce more Science, Technology, Engineering, and Math (STEM) education in early education? The answer: integration. This unit will look at circuits with a literary edge, teaching skills of sequence, vocabulary development, and informational writing while providing lessons and activities to encourage future engineers to explore and design simple circuits.
The activities in this unit are intended for students in grades 3 & 4. The goal is to not only to teach writing objectives, but also to introduce students to the world of circuits through hands-on learning, exploration of materials, and discovery. The students will work collaboratively to design small circuits and toys for education related to real-world application. This curriculum may be completed in 45-60 minute blocks over the span of 2 weeks, three or four times a week, although the lessons are structured in a way to be taught piecemeal over a longer period of time.
There is a heavy emphasis in K-3 grades to develop a students reading and writing ability before they end 3rd grade. Students get at least 120 minutes of independent reading, writing, vocabulary, grammar, and spelling instruction daily, on average. In addition, students are constantly being asked to develop their ability to read, write, and respond to texts in other subject areas, such as math and science. This does not always leave teachers the opportunity to have expeditionary or hands-on learning in the classroom. As a result, there is a need for teachers to be intentional in making time to explore and exposing their students to STEM concepts while also meeting the curriculum needs of teaching reading and writing. Recently, Edutopia published an infographic revealing that “80% of the fastest growing occupations in the United States depend upon mastery of mathematics and scientific knowledge and skills, but students are not currently equipped to satisfy this growing need.” As an educator, this statistic is staggering. It is the duty of teachers everywhere to help children not only be successful in the classroom but to be prepared for the future, especially to be able to be competitive job seekers in technical and scientific fields. This unit of study helps to peak students’ interests in Science, Technology, Engineering, & Math (STEM) at an early age, while also meeting the needs of the prescribed curriculum.
This unit is intended for students in Grade 3 and can be expanded for use in grade 4. My students spend most of the day in self-contained classrooms, except for 45-minute specialist classes each day, in addition to a 30-minute lunch, and a 15-minute recess. Students take a science class twice a week and work on three large units of study over the course of the year with that teacher, in addition to Art, Music, Gym, and Technology. This unit should be taught in a self-contained classroom. The objectives of the unit will include the following:
This unit will include age-appropriate activities to develop literacy skills and engage students in hands-on science discovery.
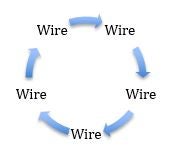
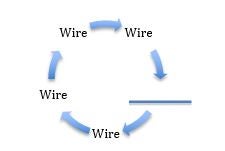
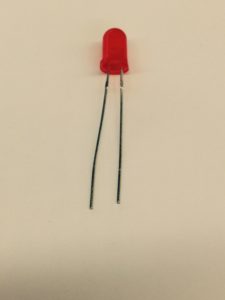
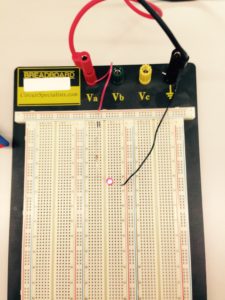
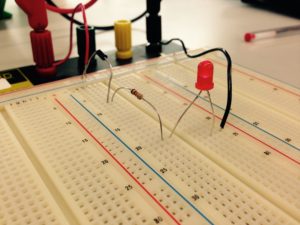
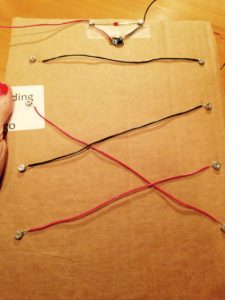
LESSON ONE: Building Background Knowledge Students will be able to (SWBAT): determine the meaning of key circuit-related vocabulary and symbols… in order to (IOT): identify the key steps of building a circuit. Overview: Students will work together in groups to try to match terms, symbols, and definitions related to electricity. Then, teacher will review answers and explicitly teach commonly used terms related to electricity and circuits. Materials: Classroom set of Vocabulary Matching Cards Vocabulary Matching Card Answer Key Hook: To begin the lesson, the teacher should hold up a symbol that should be instantly recognizable to the students (i.e. stop sign, bathroom sign, etc.). From there, they should hold up other recognizable symbols, some more difficult than others. The connection is that everyone uses symbols to represent important places, things, and even ideas. In this lesson, students will learn about the universal symbols used in electrical engineering that relate to circuits. (5 minutes) Task: The teacher should distribute a set of vocabulary matching cards to partners or small groups of students. These cards should already be cut, laminated, and bagged for easier distribution. He/she will then explain to the class that they and their partner will have 10 minutes to try to match up the symbols and meanings. Once students begin finishing up matching cards, the teacher will ask students to hold up their matches when prompted for the correct term and explain why they thought that the cards matched. Symbol Electrical Component Purpose Review: Once all of the cards have been discussed, the teacher will pass out the Answer Key has a resource for students to have in their science folders when describing circuits in their writing. This is an ample time to discuss with students their strategies for figuring out how they matched. These are the universal symbols for each term and are used across the globe to represent each component. Many of the symbols suggest the actual purpose of the electrical component and may help students’ understanding of how they interact and relate. For next time: Review the vocabulary before each lesson so students are equipped with the language to explain what is going on during their experiments. Also, be sure to begin connecting how each component affects the others. LESSON TWO: ACT THE PART Students will be able to (SWBAT): explore how a circuit works… in order to (IOT): identify the key steps of building a circuit. Overview: Students will become parts of the electrical circuits and will “act out” electricity running through a circuit. Teacher will guide students through the activity. Materials: *Styrofoam Balls *Paper and pencil *Signs/Labels: Hook: To begin the lesson, the teacher should review the symbols from the previous lesson. But what do these things look like in real life? The teacher will hold up nerf ball (or another object) and tell students these items will show them how a circuit works. Task: The teacher will have students create a circle in the classroom. This could be done as a whole class or with a small group of students to demonstrate. The teacher should label the “energy source,” “current,” and “wires” to tie in the terminology with the role-playing. Students should pass the ball or “current” around the circle. This is representative of a closed circuit. The teacher will remove a student from the circle and students should try to pass the ball or “current” again, but this time the circuit is open and cannot continue with the missing student. CLOSED CIRCUIT OPEN CIRCUIT Review: The students should work with a partner to draw an illustration to explain what the difference is between the closed and open circuit. The teacher will have students share out their responses and try to encourage students to use key terms and vocabulary learned during the previous lesson. For next time: Keep the nerf ball around or encourage students to play closed circuits at recess as a refresher if a student struggles during a lesson. LESSON THREE: EXPLORING ELECTRICITY Students will be able to (SWBAT): explore how a circuit works… in order to (IOT): identify the key steps of building a circuit. Overview: Students will explore how electricity works by trying light a bulb using a wire and battery. Students will work in small groups and will explain to classmates why or why they were not successful. Teacher will explain to the class how to make their circuits work and check for student understanding. Materials: *Light Emitting Diode (LED) *wires *Battery-operated breadboard *transistor *Transistors *Light-emitting diode (LED) Hook: Teacher will challenge students to work with partners or small groups to figure out a way to make the light bulb light up. The appeal of this lesson is that there will not be a lot of direct instruction in the beginning from the teacher. The goal is to allow the students to apply what they learned with the nerf simulation and see if they can explore and discover how to make it light up. They, in turn, will teach their classmates how to do it. Task: Teacher will distribute battery-operated breadboards with pre-set circuits, LED’s, and wires. Students will explore moving the wires to make the LED light up. Once groups are able to accomplish this task, they will have to explain how they made it work. After most groups have accomplished the goal, the teacher will review the science behind what the students just accomplished. Review: Students should complete an “exit ticket” to explain how to light up a light bulb using vocabulary learned in the previous lessons. They may draw a picture and explain how the parts connected. EXIT TICKET DIRECTIONS: In the space below, draw a picture of how you (and your partner) were able to turn on the light bulb. Be sure to label each part. _______________________________________________________________________ _______________________________________________________________________ _______________________________________________________________________ _______________________________________________________________________ _______________________________________________________________________ _______________________________________________________________________ LESSON FOUR: TIMELINES Students will be able to (SWBAT): put events in sequence in order to (IOT): establish the history and timeline of electricity. Overview: Teacher will review how to build a timeline. Students will read and create timelines about the history of electricity. Materials: * Timeline *pre-cut timeline events * glue Hook: The teacher will post two important events on the board and ask students to talk to a neighbor to decide which event probably came first. Task: The teacher will share a pre-made timeline with the class; however, there will be events that are missing from the timeline. The teacher will pair students with a partner to help each other decide where on the timeline the events should be place, using clues from other events in history. Timeline of Electricity *Content from PBS “American Experience” Review: Students will have the opportunity to check their timeline for accuracy and the class will share out important events and strategies for how they knew when events occurred. Students should then be able to analyze the relationships between key events on the timelines. Either on the bottom of their time or in a notebook, students should answer key questions such as: LESSON FIVE: “HOW TO” Students will be able to (SWBAT): explore how a circuit works… in order to (IOT): identify the key steps of building a circuit. Overview: Students will use insulated wires and battery-operated breadboards to explore how circuits function. Teachers will monitor students’ progress, troubleshoot, and explain to students some strategies for using the boards. Moreover, students will create drafts of a how to story to explain to others how to create a closed circuit. Materials: *Light Emitting Diode (LED *wires *Battery-operated breadboard *transistor *Buzzers *Breadboard with attached wires, transistor, & LED. Hook: The teacher will allow students the opportunity to explore the circuits on a breadboard to light up a buzzer and/or LED using different combinations. Task: Teacher will distribute battery-operated breadboards with no pre-set circuits, LED’s, and wires. Students will explore moving the wires to make different ways to make the LED or buzzer light up. Once groups are able to accomplish this task, they will have to explain how they made it work. After most groups have accomplished the goal, the teacher will review the science behind what the students just accomplished. Review: Students should complete a graphic organizer to explain how they arranged the wires to achieve the goal of lighting the LED or turning on the buzzer in a step-by-step process. This will help the teacher formulate if students understand the key components of the closed circuit, “own” the key vocabulary, and break down the process into key steps. This may also be done simultaneously while students are working on building the circuit with the help of a partner. HOW TO: ____________________________ ILLUSTRATION EXPLANATION _______________________________ _______________________________ _______________________________ _______________________________ _______________________________ _______________________________ _______________________________ _______________________________ _______________________________ _______________________________ _______________________________ _______________________________ LESSON SIX: QUIZ BOARD Students will be able to (SWBAT): explore how a circuit works… in order to (IOT): identify the key steps of building a circuit. Overview: Each student will take their understanding of how to make a circuit work and use it to design a quiz board that will have one component that will require the use of a circuit. NOTE: This class may need to be broken into 2-3 sessions depending on your class size. Materials: *Light Emitting Diode (LED) *wires *Battery-operated breadboard *transistor *Buzzers *cardboard sheets *Markers *scissors *Tape *Sample back of a quiz board using an LED & buzzer. Hook: The teacher will have a fun quiz question with four answer choices on a pre-made quiz board. She will invite a student up to try and find the correct answer, which will in turn light up an LED or turn on a buzzer (or both). Students will create their own quiz question to match 4 pictures with 4 answers. Task: Teacher will model how to make a quiz board for students, explaining the step-by-step process to build the board. Teacher will distribute supplies to student pairs. Students will explore connecting the wires to nuts and bolts, as well as connecting wires to make the LED or buzzer light up. Once groups have their electrical components attached, they made work on the aesthetic components. After most groups have accomplished the goal, the teacher will review the science behind what the students just accomplished. Review: Students will have the opportunity to share their quiz boards with classmates and explain the steps that they used to make it work. LESSON SEVEN: ONLINE DESIGN Students will be able to (SWBAT): Plan and conduct a simple investigation in order to (IOT): understand that different questions require different types of investigations. Overview: Students will need access to a computer in order to access “TryEngineering” at http://tryengineering.org/play-games. These interactive engineering games give students the opportunity to plan and conduct investigations in building without access to supplies at home or in the classroom. Hook: On a SMART board or a computer, the teacher will introduce students to the site and model a game, as well as set up expectations and rules. Task: Students will work independently in partners to take part on an interactive game / engineering task. Review: Students will pair-share their experiences and explain what they built and how. Students will then work with partners or independently to brainstorm their own robot or invention for the future to help others. They should include a picture and a description of how it works and whom it would help. 1. What is the name of your invention: 2. What does it do or what is its purpose: 3. How does it work: 4. How will it help others: 5. Why do you want to invent it: Draw a picture of your idea and label it. LESSON EIGHT: MINI-BOOK Students will be able to (SWBAT): explain what a circuit is and identify the key steps of building a circuit… in order to (IOT): write and publish a how to story related to circuits. Overview: Students will go through the writing process of an informational text to explain “how to build a circuit” using information gathered in their explorations of circuits. Teachers will guide students through the process. Hook: Teacher will share will students examples of technical text and how-to stories about science-related items, including invention books. The teacher should encourage each student that they are now a teacher and need to create a book to teach younger students about what they have learned in the unit. They can develop at least 3-5 chapters that may include non-fiction text features and writing to get others interested in STEM! Task: Students will use their graphic organizers, vocabulary answer key, timelines, invention idea, and other resources to create an informational text about circuits. Students should include a published version of their how-to graphic organizers, descriptions of key timeline events, and even a chapter about inventions that they would like to see create in the future. Review: There will be a “publishing party” for students to share their texts with classmates and family members.
![]()
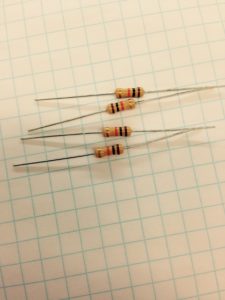
Resistor
Drop voltage


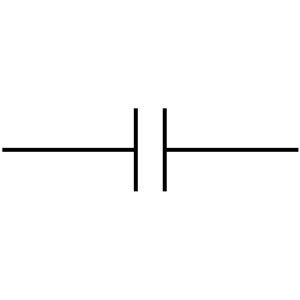
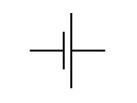
Capacitor
Store charges
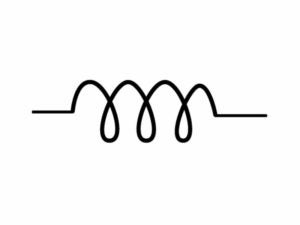
Inductor
Produces magnetic field
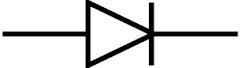
Diode
One way valve for current
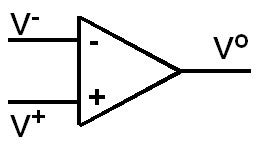
Amplifier
Amplifies voltage
Battery
Power source
1752
Lightning Rod
Benjamin Franklin’s experiments help him to conduct lightning.
1844
Telegraph
Samuel F.B. Morse sends a telegraph message to Baltimore from Washington, DC.
1858
Burglar Alarm
Edwin T. Holmes sells electric burglar alarms.
1875
Electric Dental Drill
George F. Green invents the electric dental drill.
1876
Telephone
Alexander Graham Bell patents his telephone, built with the help of Thomas A. Watson.
1877
Phonograph
Thomas Alva Edison and a team of engineers perfect a system of sound recording and transmission.
1879
Incandescent Light Bulb
Thomas Edison perfects an incandescent light bulb.
1882
Electric Fan
Dr. Schuyler Skaats Wheeler designs a two-bladed desk fan.
1921
Wire photo
Western Union sends an electronically transmitted photograph.
1927
Television
Philo Farnsworth demonstrates the first television for potential investors by broadcasting the image of a dollar sign.
1932
Defibrillator
Dr. William Bennett Kouwenhoven creates a device for jump-starting the heart using electricity.
1948
Electric Guitar
Leo Fender designs the electric guitar.
1972
Video Game
Noland Bushnell, the 28 year-old inventor of the video game Pong, will go on to start the video system Atari.
1973
Cell Phone
Motorola made the first phone call on a cell phone in New York City.
1983
PC – Personal Computer
Time Magazine named Personal Computers “Man of the Year” because of their increasing popularity.
1990
Hubble Telescope
The Hubble Telescope goes into orbit around the Earth providing information about space.
MY INVENTION
Reading List: Martinez, Sylvia Libow, and Gary S. Stager. “Invent to Learn: Making, Tinkering, and Engineering in the Classroom.” *This book stresses the importance of infusing opportunities for experimentation in the classroom. It also gives tips and ideas for how to begin incorporating meaningful play and STEM initiatives in the classroom. Platt, Charles. “Make: Electronics (Learning by Discovery).” Maker Media, Inc. December 20, 2019. *This text is a great book for those starting out in their understanding of electronics, with background information as well as small experiments. Thomas, AnnMarie. “Making Makers: Kids, Tools, and the Future of Innovation.” Maker Media, Inc. September 20, 2014. *This book focuses on the teaching of engineering in the classroom using fun ideas that encourage creativity. Wilkinson, Karen. “The Art of Tinkering.” Weldon Owen. February 4, 2014. *This book not only entertains the reader with stories of different makers, but also gives ways to begin the art of “tinkering.” Edutopia. <http://www.edutopia.org/stw-college-career-stem-infographic> *Edutopia has a plethora of newsworthy and up-to-date statistics and research that fuel teacher interest. This specific infographic (graphic with statistical information) featured facts and information about STEM education and college readiness. Bloom’s Taxonomy. <http://www.bloomstaxonomy.org/Blooms%20Taxonomy%20questions.pdf> *This site refers to the levels of questions to ask students to develop higher order thinking skills, which will help facilitate meaningful discussions, check for understand, and peak students’ interests when learning about electricity and circuits. Teacher Resources: Voltage, Current, Resistance, and Ohms Law. <https://learn.sparkfun.com/tutorials/voltage-current-resistance-and-ohms-law> *It’s crucial that teachers have an understanding of the concepts of voltage, current, resistance, and Ohms Law before teaching this unit. There are a number of great online resources to explain these ideas. Circuits for Educators. <https://www.tes.co.uk/teaching-resource/teachers-tv-electricity-circuits-6082869> *This website offers educators to watch circuits education demo lessons in a UK classroom. The teacher leads classroom discussions, models experiments, and gives students the opportunity to explore the content in a structured manner. PBS Learning Videos: Lightning. <http://www.pbslearningmedia.org/resource/phy03.sci.phys.mfw.lightning/lightning/> *This video illuminates and explains the science behind electrical storms. It is a great video to help visualize the content, yet could also be show to older elementary students. Electric Girl. <http://www.pbslearningmedia.org/resource/phy03.sci.phys.mfe.zelectgrl/electric-girl/> *This video dispels the dangers of electricity, while also encouraging students to explore what electricity is and how it relates to science. Lemon Battery. <http://www.pbslearningmedia.org/resource/phy03.sci.phys.mfw.zlemon/experimenting-with-a-lemon-battery/> *This video explains the lemon experiment that students can try at home or in the classroom. This experiment is a fun way to capture students’ attention and draw them into the content of circuits and electricity. Kid Circuits. <http://www.pbslearningmedia.org/resource/phy03.sci.phys.mfe.zcircuit/exploring-conductivity-kid-circuits/> *This specific site not only explains how circuits work, but it also explains what happens when a circuit doesn’t work and how to fix it. This deepens students’ understanding of circuits and can help them apply their think to every day life. Electricity Timeline. <http://www.pbs.org/wgbh/amex/telephone/timeline/timeline_text.html> *The importance of sequence and understanding the history of electricity/technology advances is highlighted at this PBS site. An abbreviated timeline of major events has been included in this unit for classroom use. Student Resources: Cole, Joanna. “The Magic School Bus: Gets Charged.” Scholastic. January 1, 1999. *The characters of the popular story series take a field trip through a circuit to understand how it works. This is a great book (and movie) to introduce students to the concept, especially to develop vocabulary for English Language Learners (ELL). Cole, Joanna. “The Magic School Bus and the Electric Field Trip.” Scholastic. January 1, 1999. *The characters of the popular story series take a field trip to the town’s local power plant to understand how electricity is generated and how it gets to where it needs to go. This book (and movie) helps students understand the broader scope of electricity and how it relates to building circuits. Glover, David. “Batteries, Bulbs, and Wires (Young Discoverers).” Kingfisher. February 28, 1995. Constructing Modern Knowledge Press. May 7, 2013. *An activity book that teaches, yet also uses pictures to help explain basic and complex ideas. Electric Circuits. < http://engineering-games.net/for-kids/49/electric-circuits> *This interactive website not only teaches students some of the key components of a circuit, it allows students to explore how circuits work in common items without having to purchase materials. TryEngineering. < http://tryengineering.org/play-games> *Once your students are hooked on becoming engineers, this website allows students to explore different types of engineering competing in game formats.
The Core Curriculum of the School District of Philadelphia is aligned to the Pennsylvania Academic Standards for Science Education, as well as English Language Arts Standards. These standards include instruction on the following topics: Writing with different purposes, gathering information about observations and measurements in a systematic way, and reading for information. Students will focus on writing informational texts, developing robust vocabulary, and understanding how to build a circuit. CC.1.2.3.A. Reading Informational Texts CC.1.4.3.A. Writing Informational Texts This unit of study is also aligned to the National STEM Standards, specifically those that relate to Technology for 3rd graders. 3.2.3.B4. Identify and classify objects and materials that are conductors or insulators of electricity. 3.2.3.B7. Understand that all scientific investigations involve asking and answering questions and comparing the answer with what is already known. 3.2.3.B7. Plan and conduct a simple investigation and understand that different questions require different types of investigations. 3.4.3.C1. Recognize design is a creative process and everyone can design solutions. 3.4.3.C2. Explain why the design process requires creativity and consideration of all ideas. 3.4.3.C3. Recognize that all products and systems are subject to failure; many products and systems can be fixed.
Students read, understand, and respond to informational text—with an emphasis on comprehension, vocabulary acquisition, and making connections among ideas and between texts with a focus on textual evidence.
Write informative/ explanatory texts to examine a topic and convey ideas and information clearly.