
This unit focuses on the use of traditional and non-traditional origami in its engineering and practical uses. The target audience for this unit is inner city ninth grade physical science classroom, however it can be adapted to any science classroom looking to delve into engineering and problem-solving skills. Physical science is a course that introduces students to the basic concepts of scientific principles, including the principles of matter and energy along with how these concepts are related in theory, the physical world, and the practical application. In addition to the content standards, the modern science classroom is geared towards teaching students how to collect, understand, and communicate scientific information in order to explore ideas, models, and solutions as well as generate further questions. This unit uses the basic concepts of origami to collaboratively and critically evaluate new or existing problems.
Kensington Creative and Performing Arts High School is a small high school in North Philadelphia. The student population is 60% Latino, 27% African American, 10% Caucasian and 3% Asian or other with 100% of the student population economically disadvantaged. There is a disconnect between science in the classroom and how it is used in the real world. This 8 day unit aims to provide tangible examples of various physical and geometric phenomena and their real-world uses. Each activity builds the foundational knowledge to solve an engineering problem the students find in their class, school or community. Through various forms of origami and use of the design thinking process, students will create, prototype, and test a product that can be made using origami practices. These concepts are important to teach because so often the science classroom is bogged down by standards and formulas, what is lost is the creativity and art that exists within science. Without a creative mind to apply concepts learned in science the data and skills are lost. In addition, as a creative and performing arts high school it is important to give students the opportunity to see how creativity and the arts are used in STEM.
Engagement in a science classroom is easy to obtain. Students love the many labs and hands-on activities that science offers. Recently, I started asking my students to self-reflect, what they learned in the project, and why they thought I gave them the project. The most common answer to what they learned was how to make, build, and/or mix specific substances a very literal interpretation of the activity. When asked why I gave them this project, the most common answer was, in so many words, “to give us something to do,” and, “to make us behave”. Upon my own self-reflection, I realized the students were not connecting the objective to the activity, or the activity to its real life application. I’ve since been redefining my classroom’s definition of learning from “apprehending knowledge” to “solving a problem” or “thinking”; Letting the student know that any time they have to think about something in my class, it counts as learning. Through this origami unit, I am hoping that my students will understand the connection between science as problem solving and real world applications they can create themselves.
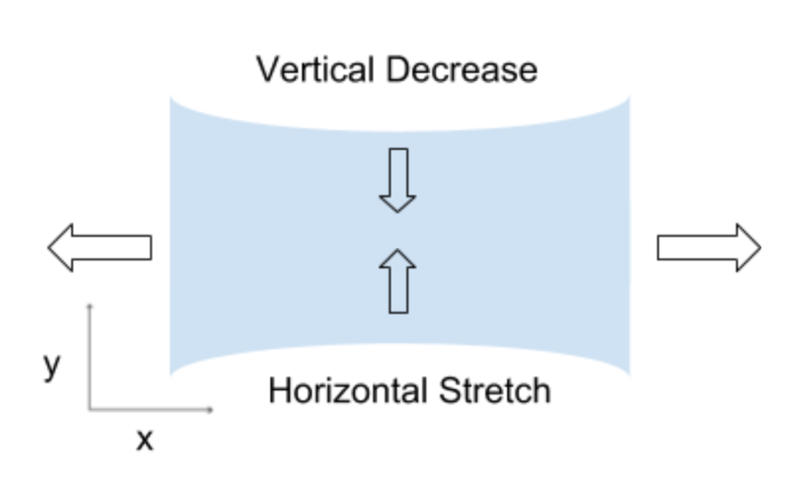
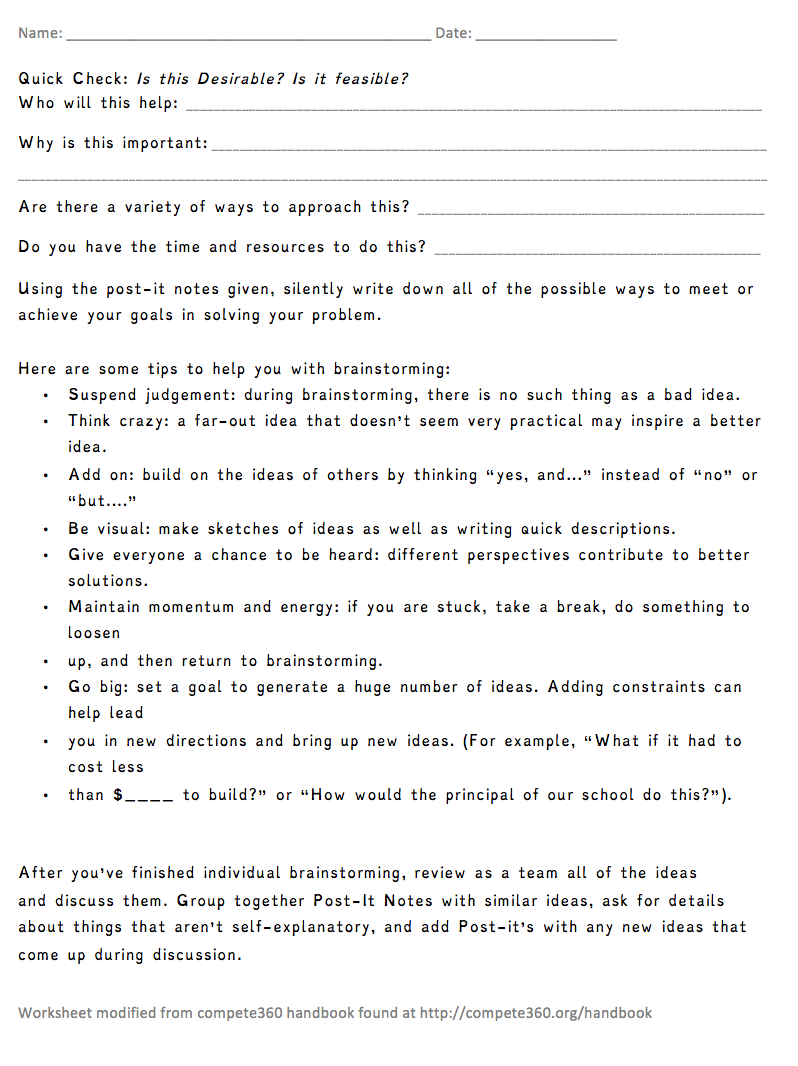
Originating in China, traditional origami figures were left in temples for religious purposes. As the art grew in popularity Origami as we are now familiar with formed into a social activity in the 6th century in Japan. In 1952 artist Akira Yoshizawa folded out of paper the 12 zodiac animals and introduced the systematic diagramming notation known as the Yoshizawa-Randlett system. The easy to follow notation and popularity in mainstream culture lead to a more formalized application including but not limited to microscale structures, space craft, robotics and computational design (Sung, 2018). With a sequence of folds, a flat piece of paper can be turned into any 3-dimensional polygonal model like the familiar paper crane. The more modern applications take the same principles of origami but apply them to state of the art self-contained medical devices. This unit will introduce students to basic paper folding techniques, underlying geometric principles of paper folding, and how this ancient art is currently being used in STEM engineering. This unit requires students to not only learn about origami but also do something with it. Design thinking is a process to teach students how to design a product or solve a problem facing people in their community. It can be used to combine teaching the content and having students seek the content to solve complex process by using technology and online resource. (Joyce Hwee Ling Koh, 2015) The framework of design thinking starts with empathizing with the user which involves observing people to identify a problem or unmet need, then defining the problem through research collecting analyzing and interpreting data to develop an actionable problem. The students can then form an idea or solution to the defined problem, prototype and test their solution. The idea behind this unit is through learning various forms of origami students can create a product to solve a problem they see in their school or community (Compete 360, 2017). The unit begins with folding notation and diagramming. It is important for students to know how to ‘read’ origami instructions which usually include nothing but arrows, dotted and solid lines as seen in figure 1. The standard notation used in origami is known as the Yoshizawa-Randlett system. The system originated in the book ‘Senbazuru Orikata’ published in 1797, Akira Yoshizawa introduced clear diagramming techniques in his published monograph “Atarashi Origami Geijutsu” these standard diagrams provide the basic folds needed throughout the unit. This system is limited however and newer symbols have been developed to describe additional actions. As origami figures increase in complexity, the notation does as well. Basic folding techniques and descriptions of each symbol can be found on Robert j. Lang’s website provided in the additional resources. (Lang, 2000). (Fig. 1. Examples of basic Akira Yoshizawa notation students will be learning) Traditional origami is one piece of paper folded into a figure. From that basic concept, new adaptations have emerged. Kirigami is the art of origami where you fold and cut the paper. Using various folds and one cut, kirigami creates pop-up structures that can be used for something as simple as a pop-up book, topography or modeling buildings. The Kamien group lays out a template pattern to make layered lattice kirigami. These individual units can be popped up or down to create multiple planes. Using the cut and fold method, students can create their own structures or works of art. (Kamien Group, n.d.). An important characteristic of paper is rigidity. When folding paper it cannot stretch longitudinally or laterally. Even flexible fabrics like cotton when stretched will increase in one direction and decrease in another as seen in Figure 2. This property limiting the movement of the material and can create an obstacle for engineers working with ridged materials. Paper and other flat materials can be folded in such a way that the length and width can be increased simultaneously when pulled on both ends. Foldable tessellations and Kirigami can be used in packing and robot development as well as the architectural community allowing motion to occur along crease lines in previously rigid materials. (Thomas A. Evans, 2015) Using tessellation folds or Kirigami for the expansion and reduction of previously ridged materials has remarkable applications in fields of science from space exploration to cellular biology. (Fig. 2. An intrinsic property of most fabrics, as the material is stretched along one axis, it shrinks in the other. As shown the fabric is stretched along the x axis and shrinks in size along the y axis) Tessellation is the geometric concept of a repeated pattern traditionally polygons without gaps or overlapping. Usually taught in geometry tessellation is also used as a method of folding a sheet of paper into a smaller area. The Miura fold uses the tessellation of parallelograms with each parallelogram forming a mirror reflection across each crease Miura fold is used in space programs to compact large solar panels before sent into space to spread out (Nishiyama, Miura Folding: Applying Origami to Space Exploration) (Japan Aerospace Exploration Agency, 2005). The Miura fold can be packed and unpacked in one motion pulling or pushing on opposite ends limiting the degrees of freedom for the panel to unfold (Nishiyama, 2012) Modular origami uses two or more folded piece of paper to create a larger structure. An easy and common unit to build a larger structure in modular origami is the Sonobe module. Each individual unit of folded paper insert into two corresponding pockets within the center square. The resulting structure can be built up by adding additional units (National Museum of Mathematics, 2013). A PHiZZ unit is a modular origami unit created by Thom Hull in 1993 that can be built up similarly to the Sonobe unit. With a strong locking mechanism these units can make a variety of shapes. Students can choose a type of modular folding and create their own unique structures. (Hull, 2000) One of the more important concepts within this unit is the application of these forms of origami. Each form of origami can be applied in different ways, flat folding, tessellations and modular origami are increasingly being taken advantage of in various STEM fields. In many cases, the final model involves some special action. A common known action origami piece is a paper fortune teller where the user moves each quadrant of the paper. A more practical application is airbags which are folded flat then pop open in a split second. In the medical field, Zhong You and Kaori Kuribayashi created an origami stent which could be inserted as a small package and ‘pop’ open when put in place (Main, 2014). Each fold students learn in this unit are used in a variety of ways in the STEM field, at the end of the unit students will be able to apply their new knowledge of origami to solve a problem of their own.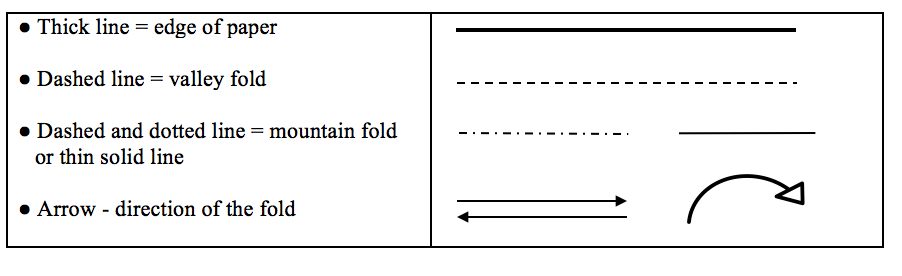
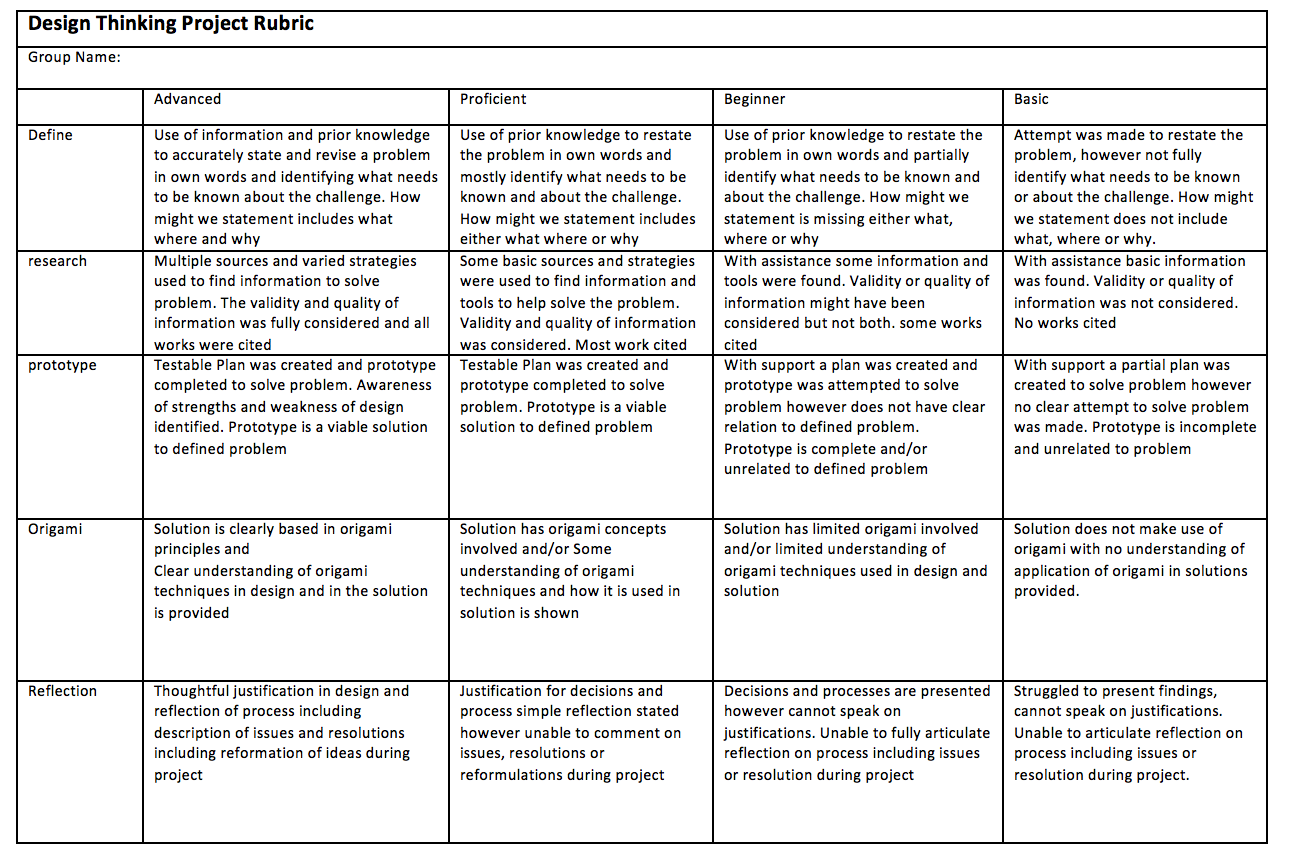
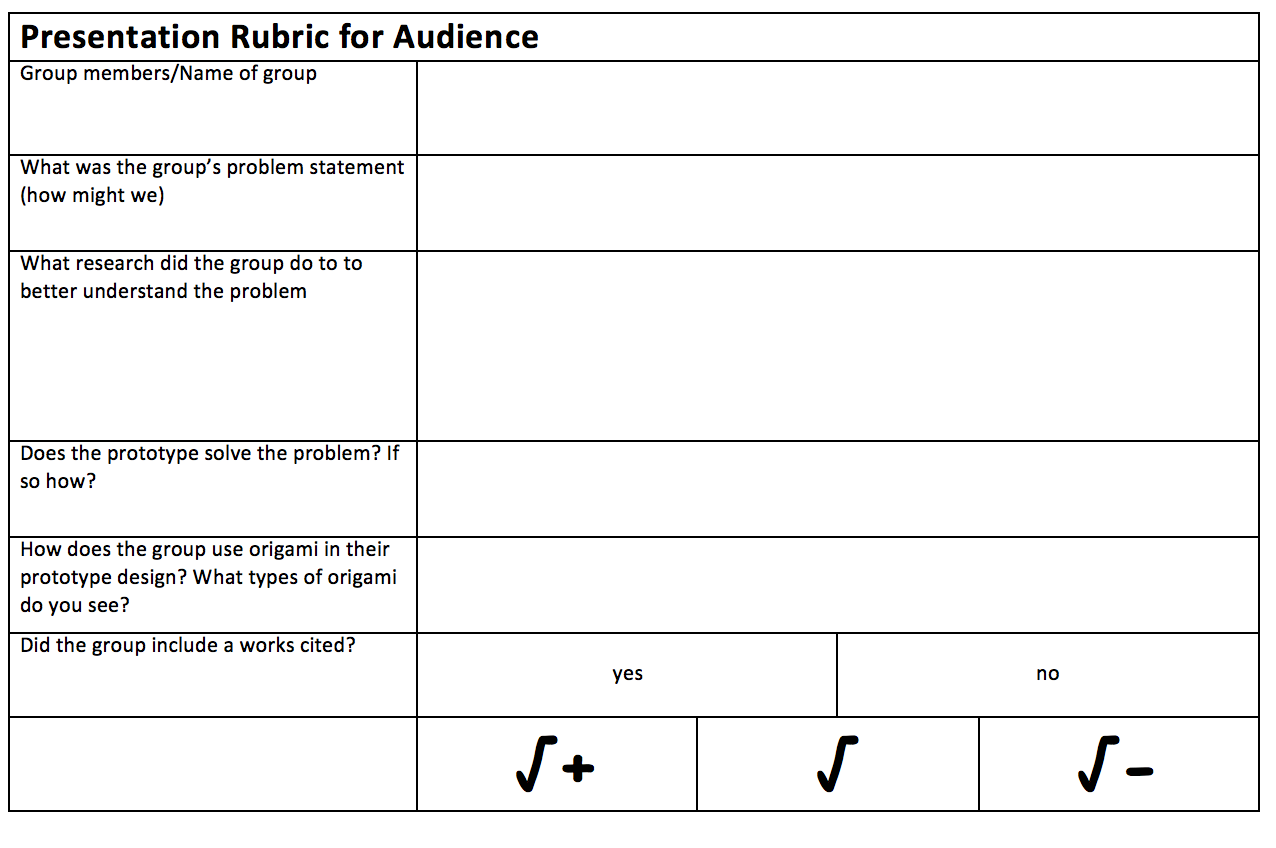
This 8 day unit is intended for students in a 9th grade physical science course but is also applicable to any science course that explores engineering or geometry. The lesson plans within this unit are designed for students who meet every other day for 90 minutes’ block periods. Common Core Follow precisely a multistep procedure when carrying out experiments, taking measurements, or performing technical tasks. CCSS.ELA-LITERACY.RST.6-8.4 Determine the meaning of symbols, key terms, and other domain-specific words and phrases as they are used in a specific scientific or technical context relevant to grades 6-8 texts and topics. Next Generation Science Standards (MS-ETS1-1) Asking questions and defining problems in grades 6–8 builds on grades K–5 experiences and progresses to specifying relationships between variables, and clarifying arguments and models. Define a design problem that can be solved through the development of an object, tool, process or system and includes multiple criteria and constraints, including scientific knowledge that may limit possible solutions. (MS-ETS1-4) Developing and Using Models Modeling in 6–8 builds on K–5 experiences and progresses to developing, using, and revising models to describe, test, and predict more abstract phenomena and design systems. Develop a model to generate data to test ideas about designed systems, including those representing inputs and outputs. ETS1.C: Optimizing the Design Solution Although one design may not perform the best across all tests, identifying the characteristics of the design that performed the best in each test can provide useful information for the redesign process—that is, some of those characteristics may be incorporated into the new design. The iterative process of testing the most promising solutions and modifying what is proposed on the basis of the test results leads to greater refinement and ultimately to an optimal solution. (MS-ETS1-4) Objectives SWBAT Establish a firm understanding of the Yoshizawa-Randlett notation IOT follow sequential procedures to construct origami figures SWBAT write a procedure for folding an origami figure using Yoshizawa-Randlett notation IOT create and follow sequential procedures to construct origami figures SWBAT Connect the use of origami to its functional, decorative and fun application IOT Construct Miura Tessellation, another tessellation or snapology module and Sonobe Unit or PHiZZ unit SWBAT Plan and Construct a structure using Miura Tessellation a tessellation or snapology module and a Sonobe Unit or PHiZZ unit IOT predict a structural outcome SWBAT use logic, imagination, intuition, and systematic reasoning, IOT research a problem and create a product using origami SWBAT evaluate the world around them on a micro and macro level IOT observe and define a solvable problem. SWBAT Give a clear, organized oral presentation IOT present an origami-based product created by the student and the solution it provides
AVerVision Video Projector – Origami is a very precise and meticulous art that requires hands on modeling. One teacher can model for several students at a time however with a class of 25-33 students projecting the folds will allow every student to view the steps all at once and will reduce the time to show every individual student the folding techniques. The video projector can give students the opportunity to lead the class while the teacher monitors student progression with active monitoring. Hands on, Active Participation, modeling – The desired outcome for this unit is for the student to create their own product or solution to a problem in the school or community. In order to create their own product, the students must first learn the applications of and how to use each origami technique before completing the unit. Each technique should be modeled by the teacher and re-created by the student. Guided Practice – (includes active participation and modeling) breaking down a skill into smaller segments so students are able to perform the task. This allows the teacher to scaffold the students learning until the students can perform the task on their own. Quick Write – quick writes are an educational tool used in this unit as a brain break and to engage previous knowledge about the topic.. The student is given a question and asked to write uninterrupted on that topic. After a quick write the teacher can check the answers or ask students to share. For more information about using quick writes and additional total classroom participation techniques in the classroom visit http://www2.beth.k12.pa.us/esol/downloads/TotalParticipation.pdf Ripple – The ripple involves students pairing up and sharing their ideas in sets of two, four, then the whole class. This allows students who are less inclined to share with the whole class share their ideas individually. It can also allow the teacher to gauge where students who are less comfortable to share out in a whole group setting are in their learning. (Persida Himmele, 2017) For a brief description of how to use the ripple in the classroom visit https://thecornerstoneforteachers.com/truth-for-teachers-podcast/total-participation-techniques/ Probing Questions – Probing questions are a tool used to guide students to the answer themselves instead of out-right telling them the answer. Annotating text – While reading, students are required to provide feedback to increase reading comprehension and encourage close active reading. For an article describing on annotating text in the classroom visit the following website http://www.collegewood.org/ourpages/auto/2014/8/17/63598523/Beyond%20the%20Yellow%20Highlighter.pdf Whole Group/Direct Instruction – in different sections of the unit the teacher will be required to instruct the class as a whole to relay information about origami and its applications in various fields of study. Direct Instruction is often used in conjunction with PowerPoint presentations or Lecturing. Cooperative Learning – Small groups comprised of students with different levels of ability work together to improve their understanding of the content. Use of Rubrics – Rubrics are key to guide students in understanding what is expected of them in the classroom, as a small group, and individually. Rubrics will be used in this unit for students to keep track of the teachers expectations, learning outcomes and what to include in their project. Design thinking process – design thinking is a process used in product design. This process allows students to become innovators and engineers to create a solution to a real life problem. More information on the design thinking process is provided in the additional resources section Timing/timers – The use of timers is a personal preference in the classroom. General timing guidelines are useful to keep the classroom focused on the parts of the lesson that are most important and limiting the amount of time the class is ‘teacher centered’ instead of ‘student centered.’ Timers can also be used to keep students focused on the task at hand. Projecting timers can assist students in time management keeping them focused on the task at hand. Based on the teacher’s professional observations, more or less time can be attributed to any given activity depending on student engagement and classroom dynamic.
SWBAT Establish a firm understanding of the yoshizawa-randlett notation IOT follow sequential procedures to construct origami figures Activity 1: (30 minutes) Reading: The Folds of History – Intro to the history of Origami. Activity 2: (15 minutes) Teacher and students fill out graphic organizer to become familiar with the Yoshizawa-Randlett notation. Interpret symbols into words. Activity 3: (40 minutes) Use Yoshizawa-Randlett notation to fold a figure as a class. Each student should be given a different folding material. Students individually fold their figure, with teacher modeling with a video-projector. When completed, students pair up by someone who found the task easy with someone who had a harder time with the folding. Have the student pairs ripple their observations about what was easy and what was hard about folding. Have students fold a separate figure on their own in their new pairs using the Yoshizawa-Randlett notation. Teacher should circulate through the classroom checking student’s ability to follow the procedure and use the Yoshizawa-Randlett notation to fold different figurines on their own. Students who are struggling can use their partner as a helpful resource. Exit Ticket: (5 minutes) (Quick Write) Silently reflect on one problem you or your partner came across while folding and how you solved it. SWBAT write a procedure for folding an origami figure using Yoshizawa-Randlett notation IOT create and follow sequential procedures to construct origami figures Activity 1: (45 minutes) Write it fold it (modified from Science Olympiad event ‘Write it Do it’ (Science Olympiad, n.d.): One student will write a description of an object and how to fold it, and the other student will attempt to construct the object off the description. Pair off students, have one student be the ‘writer’ and one student be the ‘folder.’ The folder should be separated from writer preferably outside of the classroom so they cannot peak at the final product. The writer is given a simple figure to fold such as a dog-face or fish. Give the student 10 minutes to write Yoshizawa-Randlett notation to write instructions on how to fold the object for their partner. After 10 minutes the writer should finish up, the object should be put away and the folder can come in and sit with their partner’s paper. As the folder returns the writer should then be separated. The folder can then be given a piece of origami paper and given 10 minutes to use the writer’s instructions to fold the origami figure. After 10 minutes the writer can come back in to grade how the folder did. The students should discuss with each other how to make their instructions more precise and clear to be repeated. This activity can be repeated with a new object or by reversing the roles of the partners and solidifies the importance of detailed instruction writing. Activity 2: (20 minutes) Have students pair off or set into groups. Give students 1 piece of newspaper and 5 minutes to fold it in any way to hold up as many textbooks as possible. Students should fold the paper to hold up a book 1cm above the table. Probe students to think about problems they are facing and how they solved those problems (what they learned). Activity 3: (20 minutes) When the groups finish testing their creations, give them the challenge of folding two pieces of newspaper in any way possible to create the tallest building. Probe students to think about problems they are facing and how they solved those problems (what they learned). Activity 3: (10 minutes) After testing each groups creation, have the students do a quick write (exit ticket) discussing the similarities, differences, advantages and disadvantages of each groups model as well as the mechanics of how to increase structural integrity by folding the material. SWBAT Connect the use of origami to its functional, decorative and fun application IOT Construct Miura Tessellation a tessellation or snapology module and a Sonobe Unit or PHiZZ unit Activity 1: (10-15 minutes) Demonstration: have a piece of printer paper, simple origami tessellation pre-made (A Miura Fold on printer paper should work) and a piece of fabric ready for this demonstration. Show the students some properties of paper focusing on how it does not stretch. Ask the students how this can limit the paper as a building material and if they can think of ways to overcome that limitation. Then show students the fabric and how when pulled wide in one direction, it shrinks in another (when pulled from two opposite sides). Ask the students how this can limit fabric as a building material and if they can think of ways to overcome that limitation. Use probing questions to guide students to the thought of using origami to change the property of the material. (Is there a way to take a piece of fabric or paper and change this property? How can we change the paper?) After the students have made their predictions show them the Miura fold, when two sides are pulled it expands in all directions not just one. Give students 5 or so minutes to hypothesize how doctors/astronauts/engineers/scientists can use something that pack small then unfolds into a larger? Activity 2: (30 minutes) Present to students how origami is used in various fields of study. The article and associated worksheet should be given to the students to be completed before during and after the reading. A PowerPoint presentation can be created to provide suplimental information Activity 3: (45 minutes) Instruct students how to make a PHiZZ unit, Sonobe unit and/or snapology module and show them how those individual pieces can come together to make a larger object. Let students create any object or shape they please using the individual units (soccer ball is an object that can be created if students need a goal) . While monitoring students, Ask students to think about how each individual unit comes together to form a larger structure with different properties. Activity 4: (5 minutes) Exit Ticket: what can these units be used to make in the real world? [Please see PDF attached above for additional lesson plans & worksheets]Day 1
Day 2
Day 3
https://www.origami-resource-center.com/origami-science.html
Design Thinking For worksheets, information on design thinking and examples of design thinking http://compete360.org/handbook Beginners Guide to Design Thinking http://ajjuliani.com/the-beginners-guide-to-design-thinking-in-the-classroom/ A website created to guide teachers to incorporate design thinking in their classroom. The full website includes resources and materials to help jump-start design thinking in the classroom. http://www.spencerauthor.com/design-thinking/ Examples of grading rubrics and prompts to use during each phase of the design thinking process. Origami Easy Origami is a YouTube channel providing videos in English and Portuguese https://www.youtube.com/channel/UCbEiPECXvNKtaa4dUBRUh1w Origami-Fun provides downloadable fold patterns using Yoshizawa-Randlett notation https://www.origami-fun.com/support-files/origami-stem-leaf-print.pdf This website gives a basic overview of Yoshizawa-Randlett notation and commonly accepted origami symbols https://www.origami-resource-center.com/origami-symbols.html ‘Internet Origami Crease Pattern Database’ is designed archive free crease patterns found around the internet. Crease patterns can be used as an option for students who need additional structure or visualization when folding. Teachers can print papers with the crease patterns on the paper to distribute to students. https://origami.me/crease-patterns/ The following website has an article providing additional examples and videos showing how origami is used in STEM fields. https://www.quora.com/What-are-the-different-uses-of-Origami Worksheets : The following pages contain worksheets, graphic organizers and guides that may be used throughout the unit.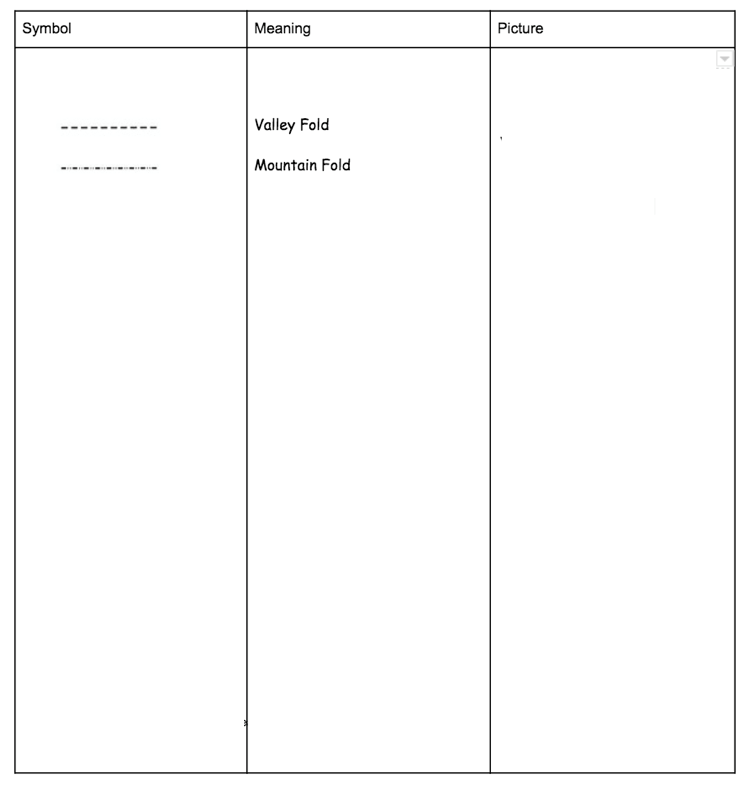
Compete 360. (2017). Design Thinking. Retrieved from Design Thinking Philadelphia: What is Design Thinking: http://compete360.org/what-design-thinking Hull, T. (2000). Pentagon Hexagon Zig-Zag. Retrieved May 2018, from http://mars.wne.edu/~thull/phzig/phzig.html Japan Aerospace Exploration Agency. (2005). 2D Array. Retrieved May 2018, from JAXA: http://www.isas.jaxa.jp/e/enterp/missions/complate/sfu/2dsa.shtml Joyce Hwee Ling Koh, C. S.-Y. (2015). Design Thinking for Education Conceptions and Applications in Teaching and Learning. Springer. Kamien Group. (n.d.). Retrieved April 2018, from Scientific Kirigami: http://scientific-kirigami.blogspot.com/p/welcome.html Lang, R. J. (2000, August). Origami Diagramming Conventions. Retrieved from Robert J. Lang Origami: http://www.langorigami.com/article/origami-diagramming-conventions Main, D. (2014, August 7). From Robots To Retinas: 9 Amazing Origami Applications. Retrieved May 2018, from Popular Science: https://www.popsci.com/article/science/robots-retinas-9-amazing-origami-applications National Museum of Mathematics. (2013, March 25). Math Monday: Introducing the Sonobe Unit. Retrieved May 2018, from MoMath: https://momath.org/home/math-monday-introducing-the-sonobe-unit/ Nishiyama, Y. (2012). Miura Folding: Applying Origami to Space Exploration. International Journal of Pure and Applied Mathematics, 79(2), 269-279. Nishiyama, Y. (n.d.). Miura Folding: Applying Origami to Space Exploration. International Journal of Pure and Applied Mathematics, 79(2), 269-279. Persida Himmele, W. H. (2017). Total Participation Techniques: Making Every Student an Active Learner, 2nd ed. Alexandria, VA: ASCD. Science Olympiad. (n.d.). Write it Do It. Retrieved May 2018, from Science Olympiad: https://www.soinc.org/write-it-do-it-b Thomas A. Evans, R. J. (2015, September 16). Rigidly foldable origami gadgets and tessellations. Royal Society Open Science.