Water is essential to all living organisms. Without water all human life on earth would cease to exist. With this is mind, it is important for students to understand where their water comes from and why it is safe for them to drink. This unit is intended for 4th grade students and will explore the story of water, from the oceans, to the clouds, to the rivers, and to the faucets of our students. Students will learn how water gets from nature to their sinks, all the possible water containments, and why their water is safe to drink. The whole unit should take 4 weeks with three lessons per week.
This unit does require the purchasing of materials. Every material can be purchased at the dollar store except for materials in Lesson 7-9. All other materials are priced at $1. A total cost breakdown for each lesson is provided; the total cost for a group over the course of the whole unit would be approximately $100 for a classroom of 30 students.
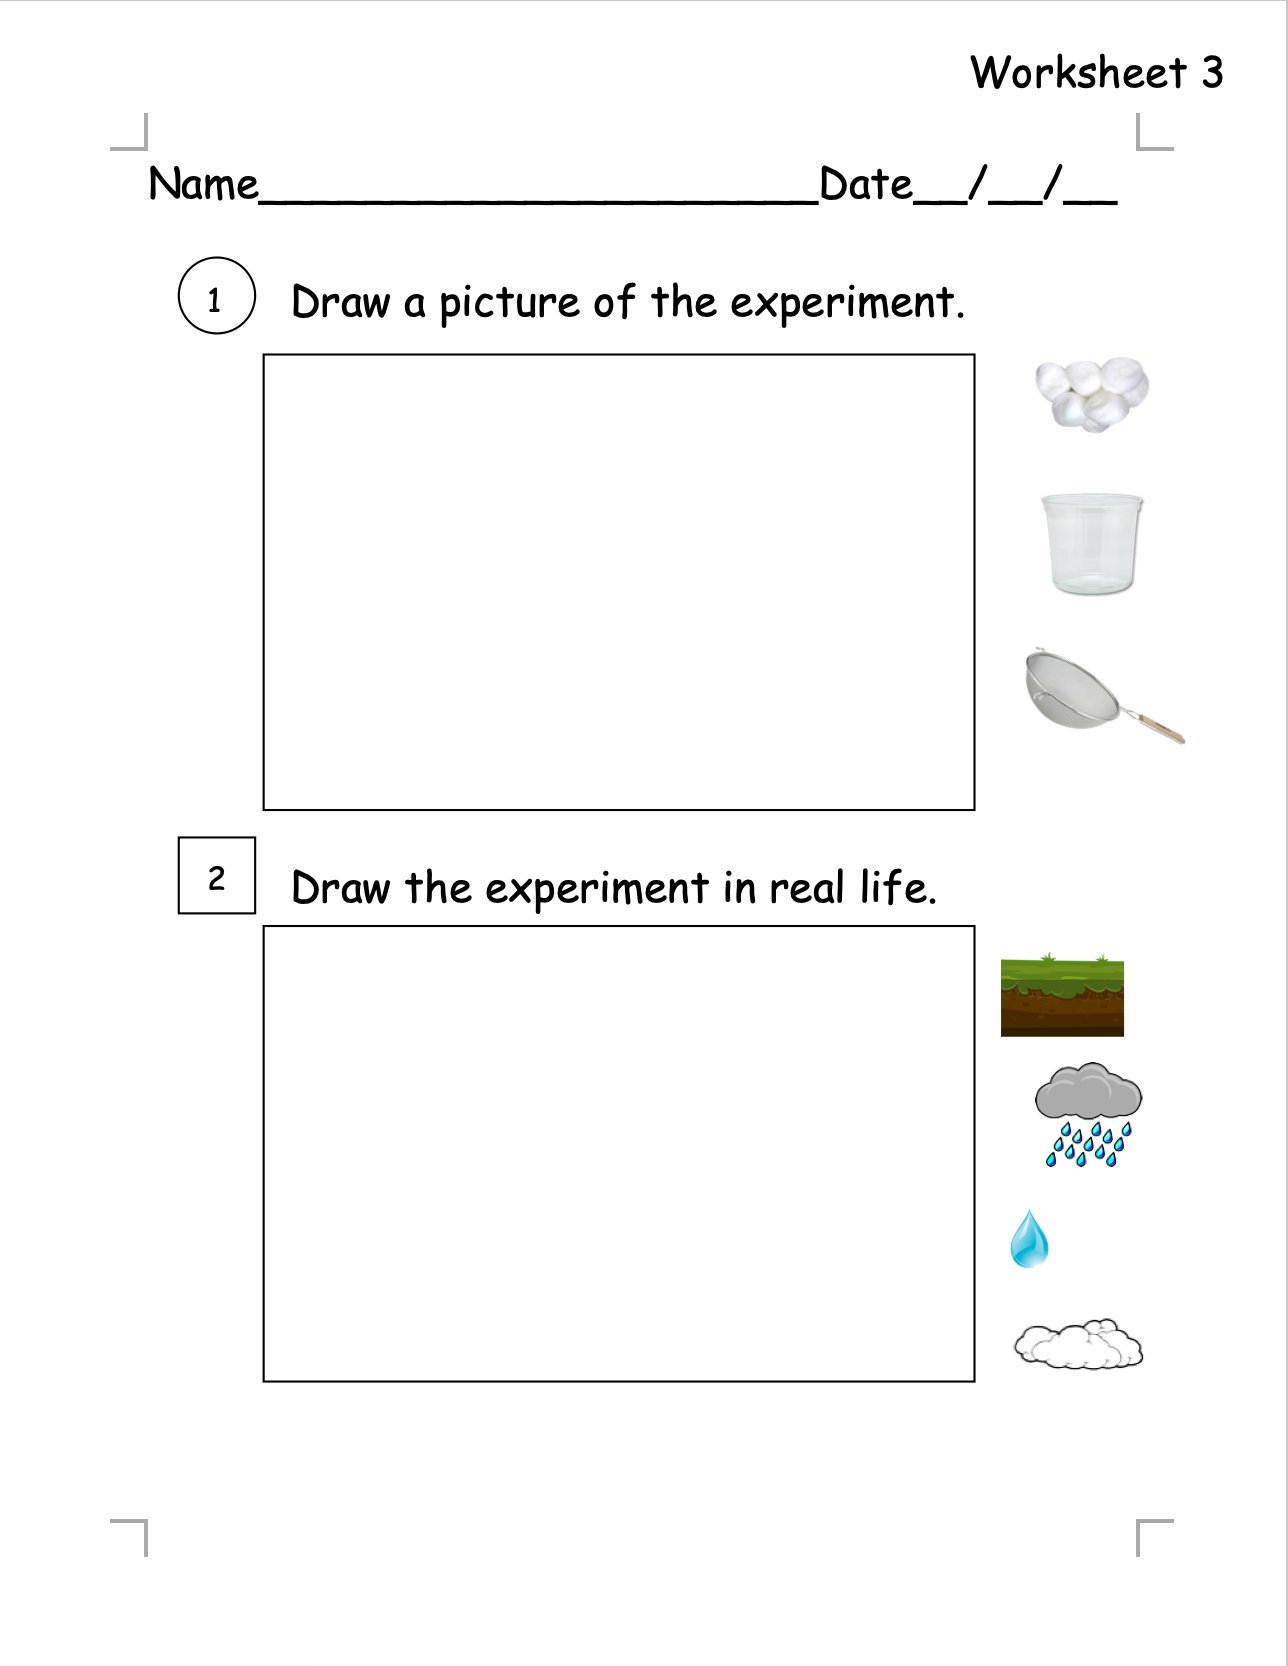
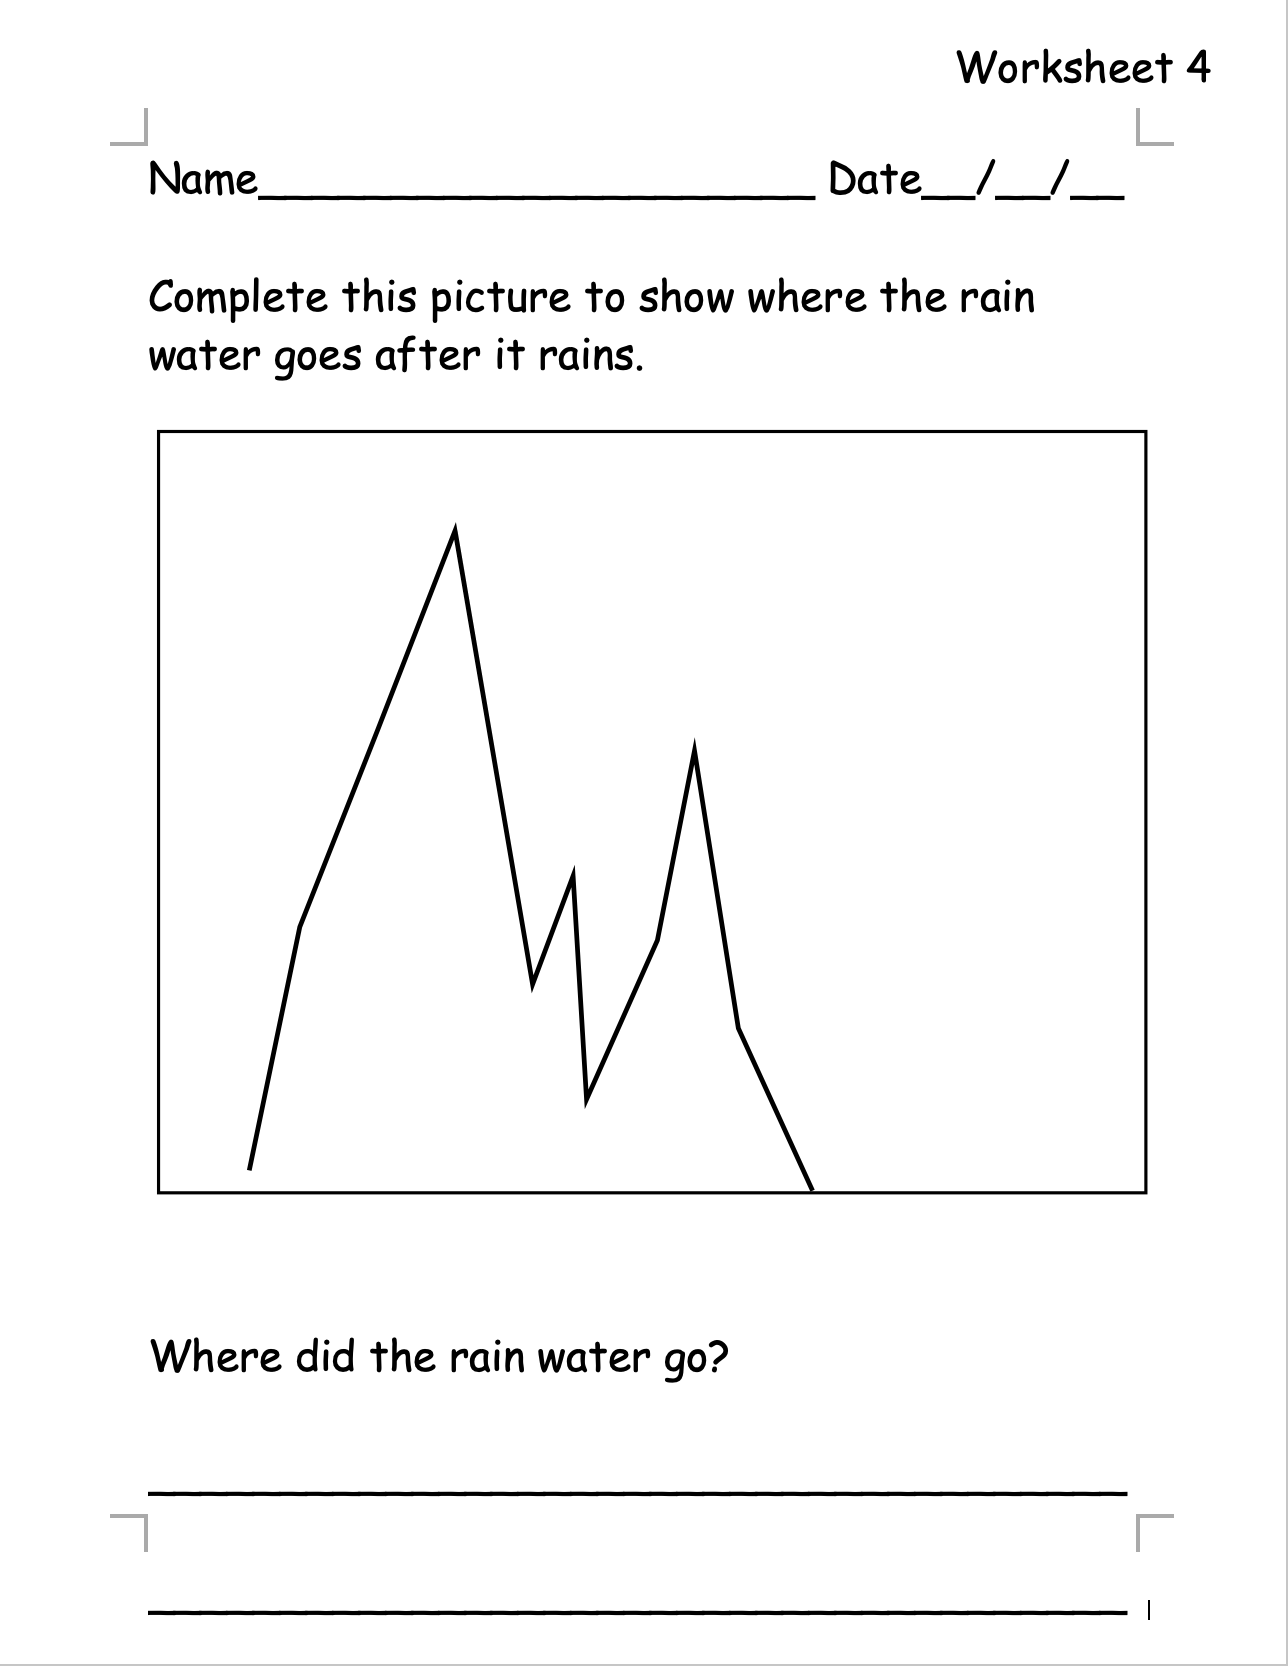
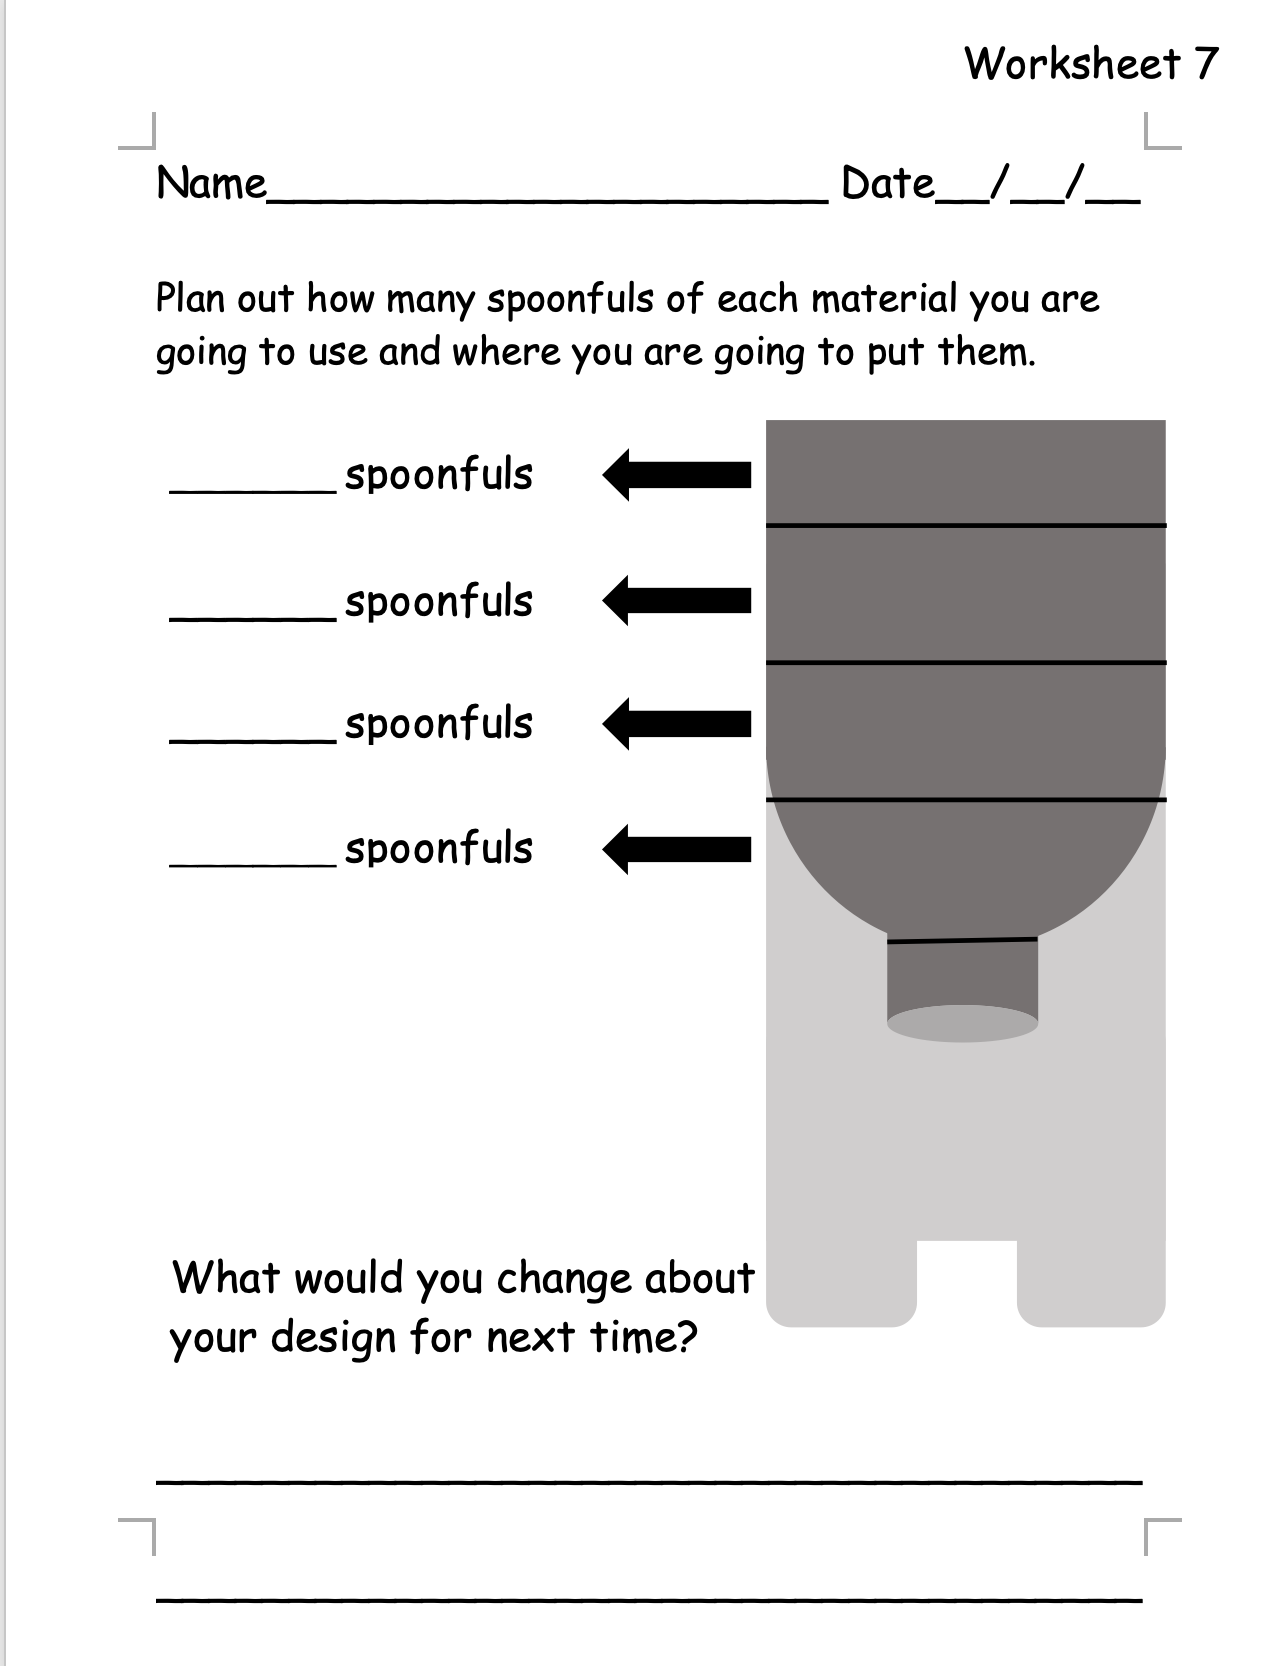
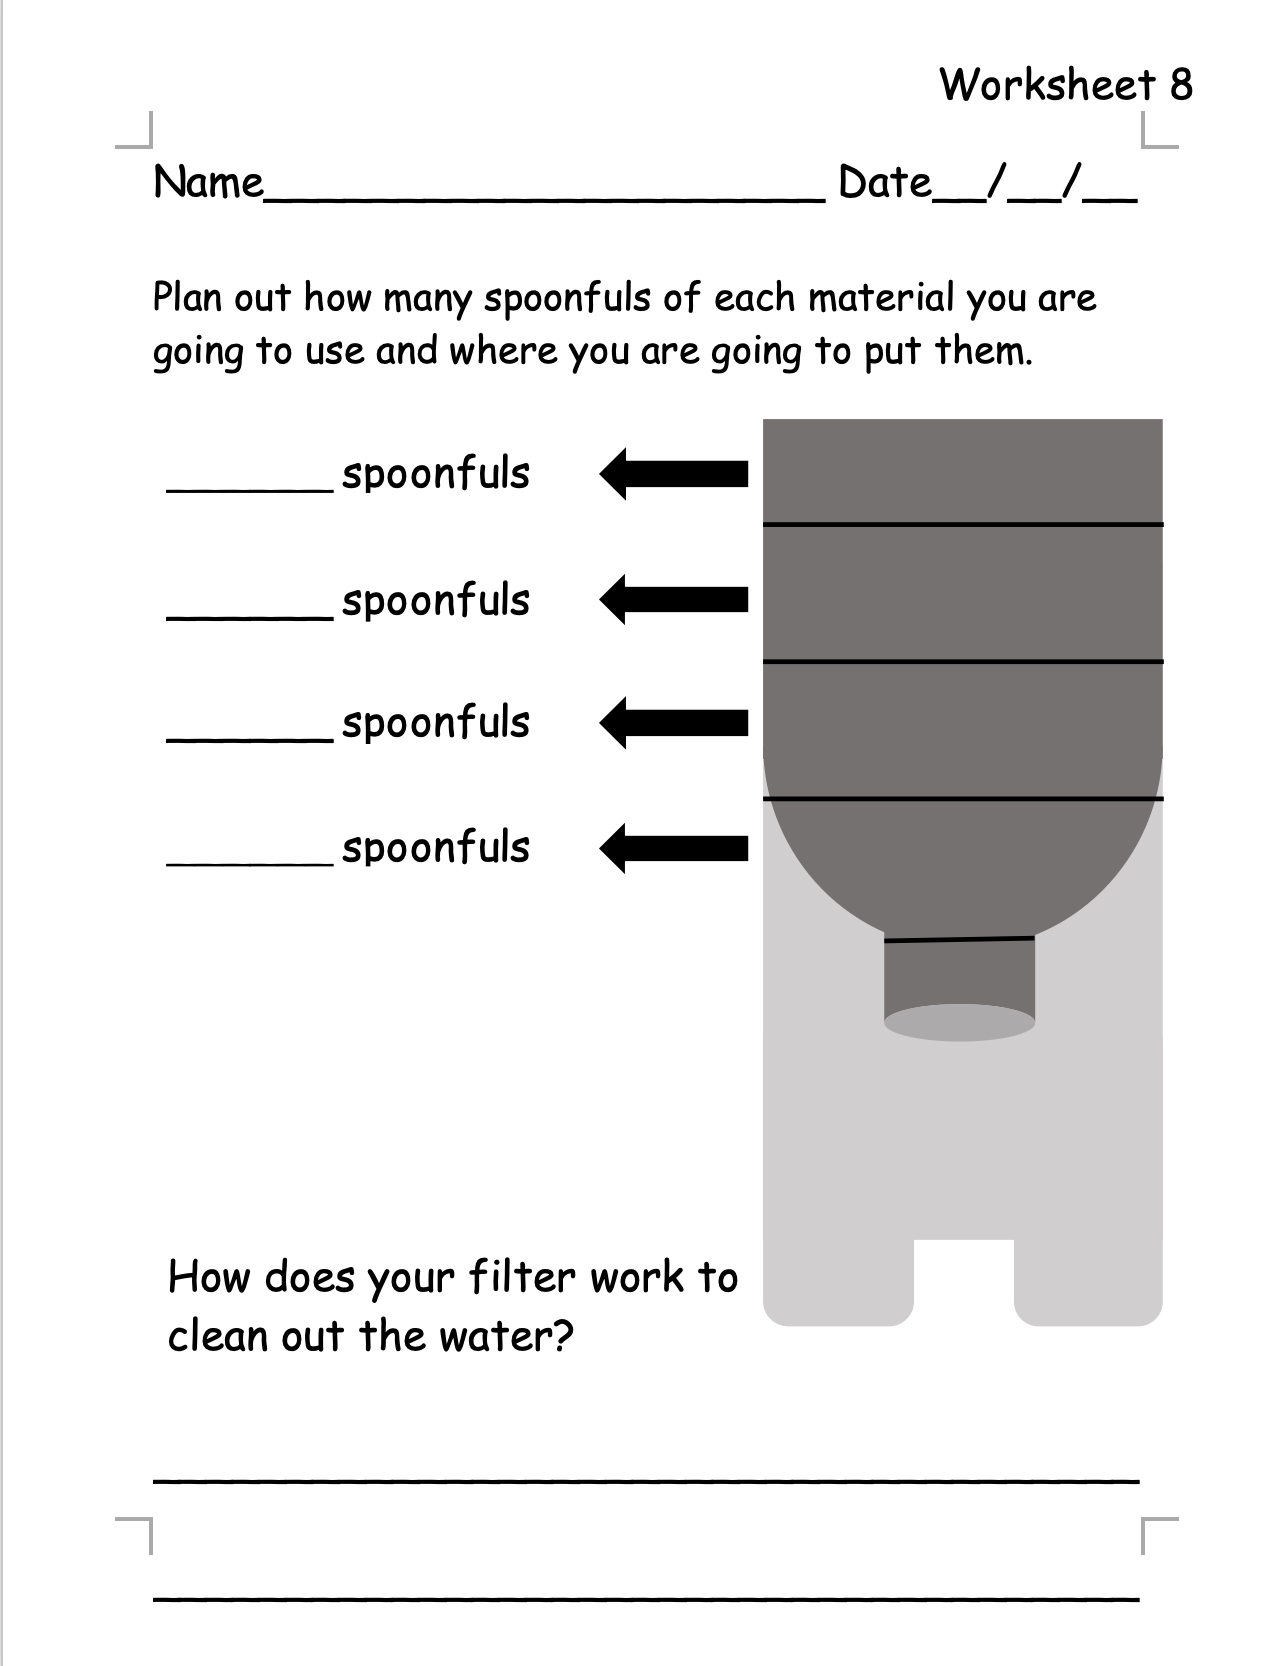
In Module 1, students are introduced to the driving phenomena of the lesson: running water, and start to explore where our water comes from. In order to do this, students learn about the water cycle. The water cycle is incredibly important to our ecosystem for without it, we would not have a replenishing water ecosystem. Water doesn’t necessarily start anywhere, but for the purpose of this mental exercise, let us pretend that water starts in the oceans (the biggest bodies of water in the world). As the sun’s heat bears upon the water, the water molecules at the surface of the water begin to heat up, and, slowly but surely, move faster than the water molecules below them. These molecules move so quickly that eventually they break apart from the rest of water and “evaporate” up into the air (a single water molecule is lighter than air, it will float up into the sky) (NatGeo, 2021). Once up in the cooler air of the atmosphere, the water molecules will cool down and become attracted to each other (due to the slight positive charge of the hydrogen atoms and the slight negative charge of the oxygen atoms) (USGS, 2021). I like to tell my younger students that water is “sticky” and show them how water will stick to fingers or hands after washing (demonstrating the stickiness of water). These attracted water molecules condense together into clouds (condensation). Finally, when these clouds of condensed water vapor become saturated enough (and grey enough) with water, they will release their contents upon the earth (precipitation). Eventually this rain water will make its way back to the ocean and the process will start again. I should note that this process does not start with an ocean, it can start with any body of water (small or large) that has the ability to evaporate into the atmosphere (as is demonstrated in the first and second lesson of this unit). In the first lesson of Module 1, students will create an initial model of how they think water gets to them from the faucet. This initial model will help guide them throughout the whole unit and they will return to their model to modify and change their thinking throughout the unit. Then they will come up with questions that they think will help them to solve the overarching question of “where does water come from.” Finally, students create a model of the water cycle inside a plastic bag and along with an open cup of water, will leave the two on a windowsill or wall with sunlight. In the second lesson students will observe their cups and baggies. They should see that water has evaporated from their cups and the water level is lower, and that water has evaporated in the baggies but was trapped inside the bag and condensed into a cloud at the top. In the third lesson, the teacher will bring in cotton balls, a strainer or colander, a clear container underneath for the strainer to sit in, black food coloring (optional), and something to pour water with. The cotton balls will go inside the strainer and the strainer will sit atop the clear container. One by one students can come up and pour a little bit of grey color water on top of the cotton balls. Eventually the cotton balls will turn grey and start dripping into the container below, demonstrating as clouds fill up with water they will begin to rain. After this experiment, in the second half of the third lesson, the teacher will lead a discussion about what the students have learned and how it relates to their question of “where does water come from.” Students should be able to explain the water cycle using the information from the evaporated and condensed water from the cups and baggies experiment, and the precipitating water from the cotton ball and colander experiment. Once students understand the basic principles of the water cycle, we want them to start to question where their own water comes from. In Module 2 students will explore the greater Philadelphia area using maps to understand the Delaware River Watershed. Most of our water comes from the Delaware River Watershed. A watershed is a land area that directs water towards a centralized body of water, think the valley between mountains collecting rainwater at the basin and creating a river ( (NOAA, 2021). After a rainfall the water will eventually flow to streams, rivers, and lakes, this is accomplished through water run off. The most common form of run-off is direct run-off, where rainwater flows towards an established body of water by the process of gravity (like a river). In Philadelphia we get all of our water from two major rivers, the Schuylkill and the Delaware River. In our seminar with Professor Howarth, we discussed at length the health hazards that come with water runoff. Whatever has collected on the ground, primarily trash, or whatever chemicals may be on the groud from roadways, industrial factories, or farming can make their way into our drinking water sources (the Delaware and Schuylkill Rivers). Containments in the water may include: microbial contaminants (viruses, bacteria, and parasites) from sewage treatment plants, septic systems, or agricultural livestock and wildlife; salts and metals from industrial run off and roadways, oil and petroleum byproducts from gas and oil production; pesticides and herbicides from farms, golf courses, or lawns; and even some radioactive contaminants (PWD, 2020) If ingested many of these contaminants could cause serious illness, cancer, or even death. In 2014, 7,500,000 illnesses in the US were a result of waterborne transmission (Collier, et al., 2021). Take for example, giardia. Giardia is a tiny parasite which can cause severe diarrhea in animals and humans (CDC, Parasites – Giardia, 2021). Giardia occurs in fecal matter and can find its way into our water sources through various forms such as farm water run-off (CDC, Giardia and Drinking Water From Private Wells, 2021). Without our water filtration systems put into place by the EPA we would have many more cases of giardia each year (EPA, 1989). According to the PA Health Department, in 2016 they were recording between 650 and 1100 cases of giardia per year (PA.DOH, 2016). In 2016 Pennsylvania’s population was 12.78 million. If we look at other countries with similar or even smaller populations Belgium (11.33 million), Bulgaria (7.128) they had 1,998 and 1,368 cases respectively (ECDC, 2018). Without adequate filtration systems, giardia could resurge and once again become a problem. It is for this reason and many other contaminant concerns that we need to clean our drinking water thoroughly and properly. In Module 2, students will figure out where the water goes after it rains and why we need to clean it so thoroughly. The concept of a watershed will be introduced and students will understand that within a given region, all water run-off will eventually lead to centralized locations. In the fourth lesson, students will crumple up a piece of square aluminum paper, uncrumple it and tape it down to a piece of paper. It should look crumpled with lots of peaks and valleys. Students will use a blue, black, green, or purple marker to mark the tops of all the ridges. They will then spray water along the tops of the mountains and they should be able to see the water picking up the coloring and running down the mountains and into the valleys. The students can make the connections that the water raining on the mountains will lead down to rivers and streams. In the fifth lesson students will use the provided map template for Eastern Pennsylvania, New York, and New Jersey to color in the Poconos Mountain Range and the Appalachian Mountain Range, the Delaware and Schuylkill rivers, and Philadelphia. Students will research where the most rainfall occurs. Students should come to the conclusion that it rains the most in the mountains, all that water flows down into the rivers, and that water comes to Philadelphia. Finally, students will brainstorm all of the sources of water contamination that can make water polluted: oil and salt from roadways, fertilizer and manure from farms, combined sewer overflow, trash that washes into storm drains. In the sixth lesson students are given two different water samples to taste test (one from the schools drinking fountain and one from a bottled water company of your choice). The students compare the two and think about why the water tastes different (or the same). The teacher will make the point that taste may be coming from minerals that are not harmful and do not necessarily mean that the water is dirty. At this point students should start thinking about cleaning the water that is in the rivers that they are drinking. The teacher will put up a slide showing dirty river water under a microscope. Students will brainstorm different ways they can clean their water and the teacher will guide their brainstorming towards the idea of a water filter. According to the City of Philadelphia, there are three water treatment plants: Baxter, Queen Lane, and Belmont. Baxter takes water from the Delaware River and Queen Lane and Belmont both get water from the Schuylkill River. The process of cleaning and filtering water comes in 8 steps. Step 1: put the dirty water in a large tank and allow all the large sediment to fall to the bottom (this is called gravity settling). Step 2: add the chemical sodium hypochlorite which will disinfect the water and kill most disease causing organisms. Step 3: add a coagulant to make incredibly small suspended sediment clump together; also add Lime to adjust the PH level of the water. Step 4: another gravity settling to allow the newly coagulated material to settle at the bottom. Step 5: another round of sodium hypochlorite to disinfect the water. Step 6: filter the water through various filters (sand, charcoal, and gravel) which will remove the various sediment and dead bacteria and viruses. Step 7: fluoride is added to the water to prevent tooth decay, Zinc Orthophosphate is added to minimize pipe corrosion and Ammonia is added to keep the disinfectant in the water and reduce the chlorine taste and odor (from the hypochlorite added in step 2 and step 5). Step 8: send the water off through the pipes to the residents of Philadelphia (PWD, 2020). In the 3rd Module students will explore the idea of water cleaning and filtration. In the seventh lesson students will make their own water filter. This can be accomplished by having the teacher cut off 1-liter bottle heads about 5 inches from the top, attaching cheese cloth to the lip of the bottle, and placing the top half of the bottle lip-side down into the now-exposed second half the bottle. The students can then fill up the filter with wood chips, sand, rocks, and activated charcoal. Muddy water (teacher-made) can then be passed through the filters and students can evaluate how well their filter worked. Students can then compare their filters to pictures of cross-cut filters to find the similarities and the differences. In the eighth lesson students will retry their water filter using the information they learned from the last class. In the ninth and final lesson students will explore the idea of chemical filtering. Students will be introduced to the idea of Iodine and will watch the teacher use Iodine on water. Permission slips will be needed ahead of time for this, but you could have two different bottles, one with Iodine one without and you could have the students taste it, since Iodine leaves a distinct taste in the water. In the 4th and final module students will have three class periods to work on a project to demonstrate what they have learned throughout the unit about how water gets to them. Students may work in groups or by themselves, they can create models, write a story, draw a cartoon or comic, or even create a poem or play that demonstrate how the water cycle works, how water gets to Philadelphia, and how that water is cleaned. No lesson plans are provided for this module since the outcomes of these lessons are very much up to the teacher and their students. I stress that while no lesson plans are provided this module is the most important module. This is when students compile all of their thinking and learning into a cohesive idea. They will learn team working skills if they are working in a group and they will develop confidence by presenting their ideas to the class. Please to do not skip this last module. This unit will utilize the phenomena-based learning approach. Phenomena based learning is an approach to teaching where students are presented with an initial phenomenon which they cannot explain (NGSS, 2021). The rest of the unit is spent asking and answering questions and completing experiments to help them figure out a way to explain the phenomenon (NGSS, 2021). In this unit, the phenomenon is very simple, it is a faucet turning on and the water coming out. That is an amazing achievement, since for most of humanity’s existence, this has not been the norm, and still for some today it is not the norm. The students will be tasked with explaining how the water got there, and how we know it is safe to the drink. In the first lesson students will be introduced to the phenomena and will be tasked with brainstorming together an explanation to the phenomena without any prior knowledge. This is called an “initial consensus model.” As students explore the water cycle, water run-off, and water filtration, they will revisit this initial explanation throughout the unit to update their thinking and keep track of what they have learned. Finally at the end of the unit, students will sum up everything they have learned in some sort of final project. This can be a story, a comic book, an experiment, a model, or anything they can think of which demonstrates their learning throughout the unit.Module 1
Module 2
Module 3
Module 4
Pedagogical Approach
Modeling: Students will create three models during the unit, a model of the water cycle, a model of a mountain range, and a model of a water filter. These models allow students to visualize the scientific concepts of evaporation, condensation, precipitation, run off, and filtration in a tangible form. Compare and Contrast: in two lessons students will be tasked with comparing different maps of the Philadelphia Tri-State Area as well as comparing different water samples collected from Philadelphia. These activities will encourage students to analyze and think critically about the water they are drinking and the geographical region they are a part of. Cooperative learning: Throughout each lesson students will be asked to work with the people around them. Additionally, students will have the opportunity to work in groups during the mountain range and water filter activity. Inquiry Based Instruction: Each lesson will start with a question which the students are tasked with answering by the lesson’s closing. By answering these questions students will gain a better understanding of how to answer the overarching unit question and how to explain the unit phenomenon. Anticipation Guide: Students will ask questions about the phenomenon at the beginning of the unit. These questions will help guide their inquiry as the teacher weaves their questions into the various lessons. By having students brainstorm their own questioning, this empowers their own learning and makes these lessons feel more real to them.
The following nine lesson plans are intended for 45-minute blocks. At the end of the lessons are printouts for the various worksheets needed, along with the various pictures or diagrams needed throughout the unit. Question: How does water get up into the sky? Objective: SWBAT set up an experiment to observe the evaporation of water. Standard: 3.2.4.A5: Use models to demonstrate the physical change as water goes from liquid to ice and from liquid to vapor. Vocabulary: Evaporation, condensation, precipitation Materials: Per student: Total cost: 3 box of 10 bags ($3) + 3 sleeve of 10 cups ($3) = $6 To Do: (5 mins) (10 mins) (5 mins) (5 mins) (2 mins) (3 mins) (5 mins) Question: Where did our water go? Objectives: Standard: 3.2.4.A5: Use models to demonstrate the physical change as water goes from liquid to ice and from liquid to vapor. Vocabulary: Evaporation, condensation, precipitation Materials: Per student: Total Cost = No cost, reuse materials from last class To Do: (5 mins) (10 mins) (10 mins) (15 mins) (5 mins) Question: What happens when a cloud fills up with water? Objective: SWBAT use a model to explain how rainclouds form Standard: 3.3.4.A4 Describe phase changes in the forms of water on Earth. Vocabulary: Evaporation, condensation, precipitation Materials: Whole class: Per student: Total Cost: 1 bag of cotton balls ($1) + 1 box of food coloring ($1) = $2 *I am assuming you can bring in 1 TBSP spoon, bowl, and colander/strainer from home please. Set Up: Put strainer/colander in bowl and put enough cotton balls in strainer to fill to the top. Put this aside, you will use this after the opening discussion. To Do: (5 mins) (5 mins) (3 mins) (7 mins) (5 mins) (10 mins) (5 mins) (5 mins) Teacher: Asks Closing Question – Where do you think the water goes after it rains? Question: Where does water go after it rains? Objectives: Standard: 3.3.4.A6: Identify basic landforms using models and simple maps. Vocabulary: Watershed, run-off Materials: Per student: Per table: Total cost: 2 rolls of aluminum ($2) + up to 8 spray bottles ($8) = $10 Prep: Cut aluminum foil into squares for each student To Do: (5 mins) (5 mins) (7 mins) (5 mins) (5 mins) (10 mins) (7 mins) Question: Where are the mountains and rivers around us? Objectives: Standard: 4-ESS2-2. Analyze and interpret data from maps to describe patterns of Earth’s features. Vocabulary: Watershed, run-off, topographic, pollution Materials: Worksheet 5 (No cost) To Do: (3 mins) (2 mins) (3 mins) (2 mins) (5 mins) (5 mins) (3 mins) (5 mins) (3 mins) (5 mins) (2 mins) (3 mins) (2 mins) Question: Does all water taste the same? Objectives: Standard: 3.3.4.A4 Recognize Earth’s different water resources, including both fresh and saltwater. Vocabulary: Watershed, run-off, pollution, industrial waste, farm waste Materials: Per student: Total cost: 3 sleeves of small cups ($3) Prep: You can prepare all the cups ahead of time, 2-3 cups of water per student To Do: (5 mins) (5 mins) (5 mins) (5 mins) (5 mins) (5 mins) (10 mins) (5 mins) Question: How can we clean water? Pt 1. Objective: Standards: Vocabulary: Filter, charcoal Materials: Per group of 4: This lesson is adapted from Hungry SciANNtist via YouTube. Video can be found on YouTube by visiting their YouTube channel and searching for “water filter” *You can purchase these materials at Lowes, your local hardware store, or Amazon. Make sure you get activated charcoal designed for plants and not for fish tanks. A 24-32oz bag should last you enough for both this experiment and Lesson 7. Total cost: 8 1 liter bottles ($16) + 2 sleeves of party cups ($2) + activated charcoal ($10) + hickory wood chips ($8) + 50lb sand *smallest they have ($5) + .5 cu ft pebbles ($10) + 1 bag of cotton balls ($1) = $46 Prep: To Do: (2 mins) (3 mins) (3 mins) (5 mins) (3 mins) (10 mins) (5 mins) (5 mins) (3 mins) (3 mins) (3 mins) Question: How can we clean water? Pt 2. Objective: SWBAT build and retest their second design of a water filter Standard: Vocabulary: Filter, charcoal Materials: Per group of 4: This lesson is adapted from Hungry SciANNtist via YouTube. Check the appendix for the video link to watch their video. *You can purchase these materials at Lowes, your local hardware store, or Amazon. Make sure you get activated charcoal designed for plants and not for fish tanks. A 24-32oz bag should last you enough for both this experiment and Lesson 7. Total cost: 8 1 liter bottles ($16) + 2 sleeves of party cups ($2) + activated charcoal ($10) + hickory wood chips ($8) + 50lb sand *smallest they have ($5) + .5 cu ft pebbles ($10) + 1 bag of cotton balls ($1) = $46 However, you should have left over charcoal, pebbles, and woodchips so the cost would be 46 – (10+8+10) = $18 Prep: To Do: (3 mins) (2 mins ) (5 mins) (3 mins) (10 mins) (5 mins) (5 mins) (5 mins) (5 mins) (2 mins) Question: How do we get rid of those microorganisms in the water? Objective: Standard: 3.4.4.B1Describe how technology affects humans in various ways. Vocabulary: Filter, iodine Materials: Per student: Whole class Total Cost: two 1-liter bottles ($4) + tincture of iodine ($6) + 3 sleeves of 10 cups ($3) = $13 Prep: At least 1 week in advance send home the permission slip. This will allow your students the opportunity to taste the iodine water. It has a distinctive taste and will be interesting for your students if they are able to. Make sure none of your students have a iodine allergy. To Do: (5 mins) (5 mins) (2 mins) (3 mins) (5 mins) (5 mins) (5 mins) (5 mins) (10 mins)Module 1: The Water Cycle
Lesson 1
Lesson 2
Lesson 3
Module 2: Watershed and Water Pollution
Lesson 4
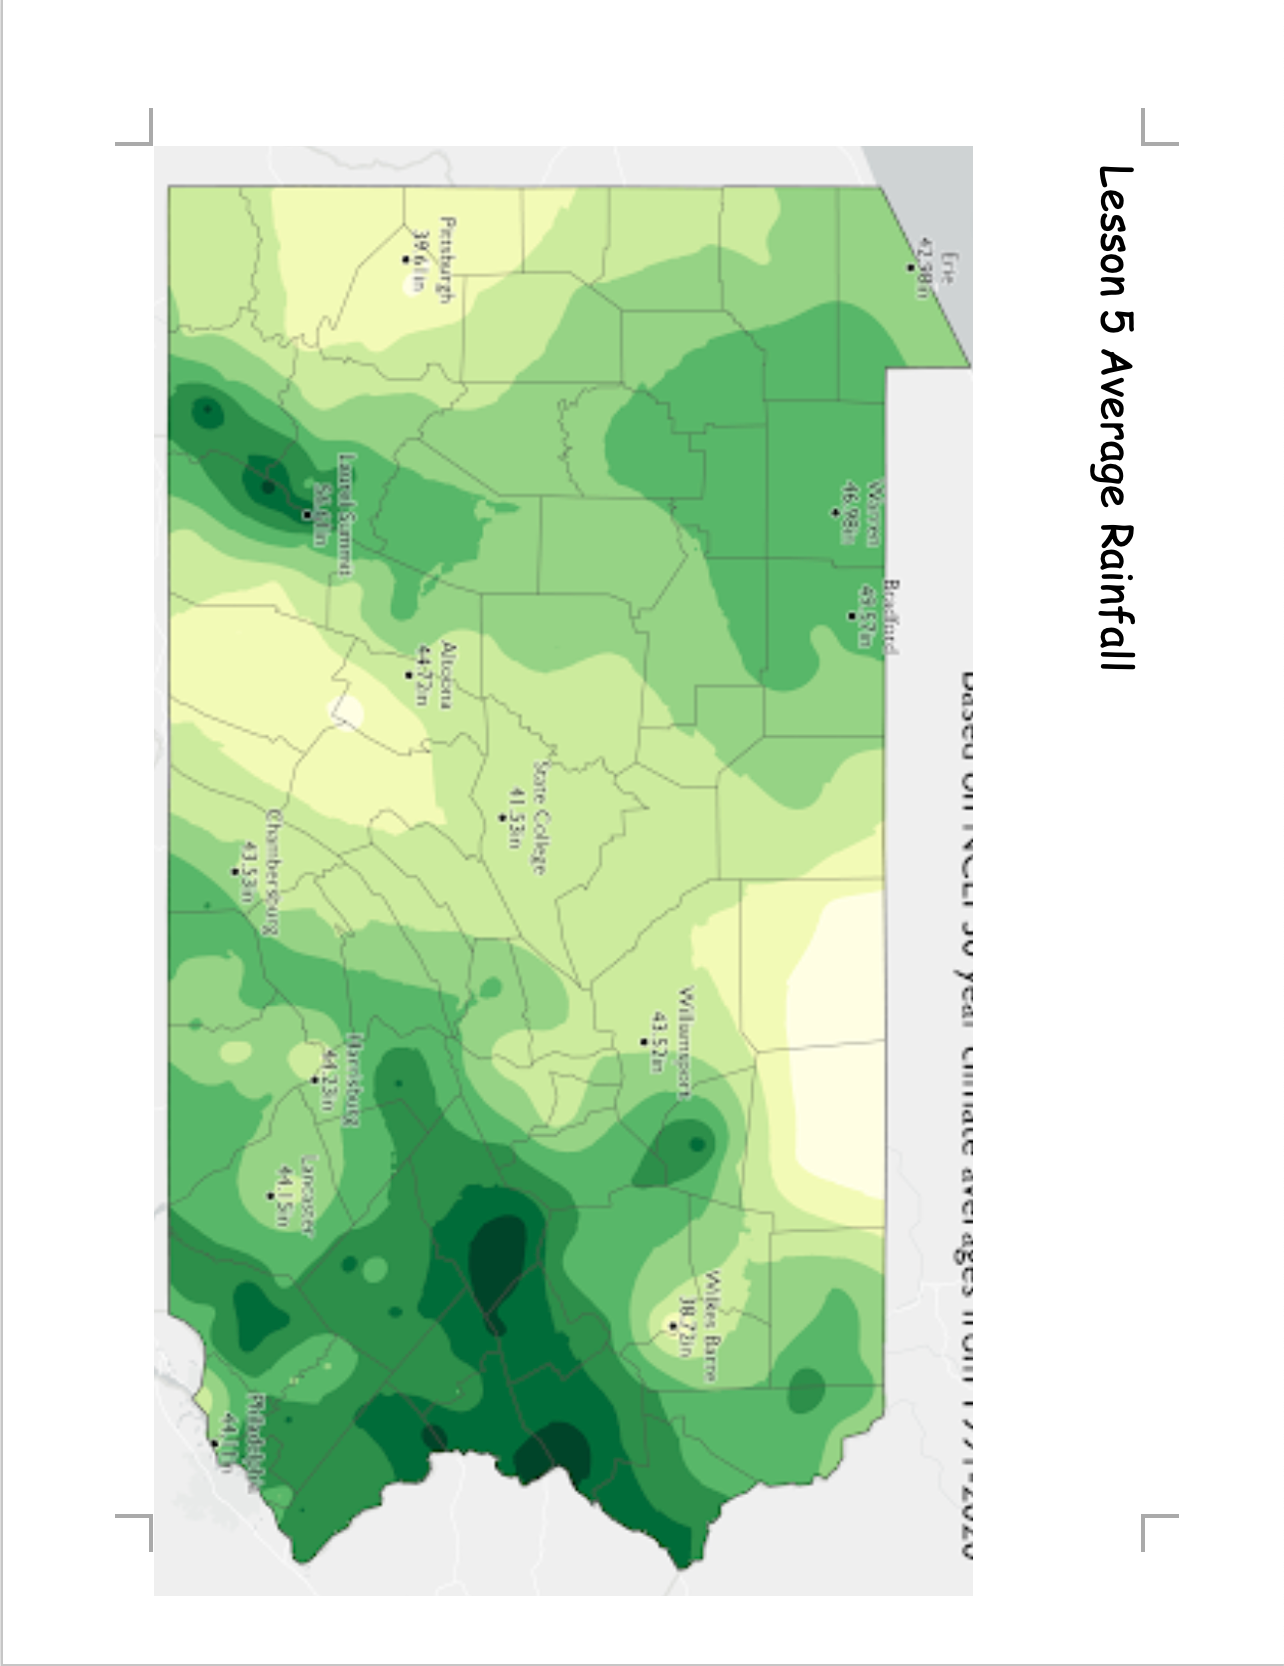
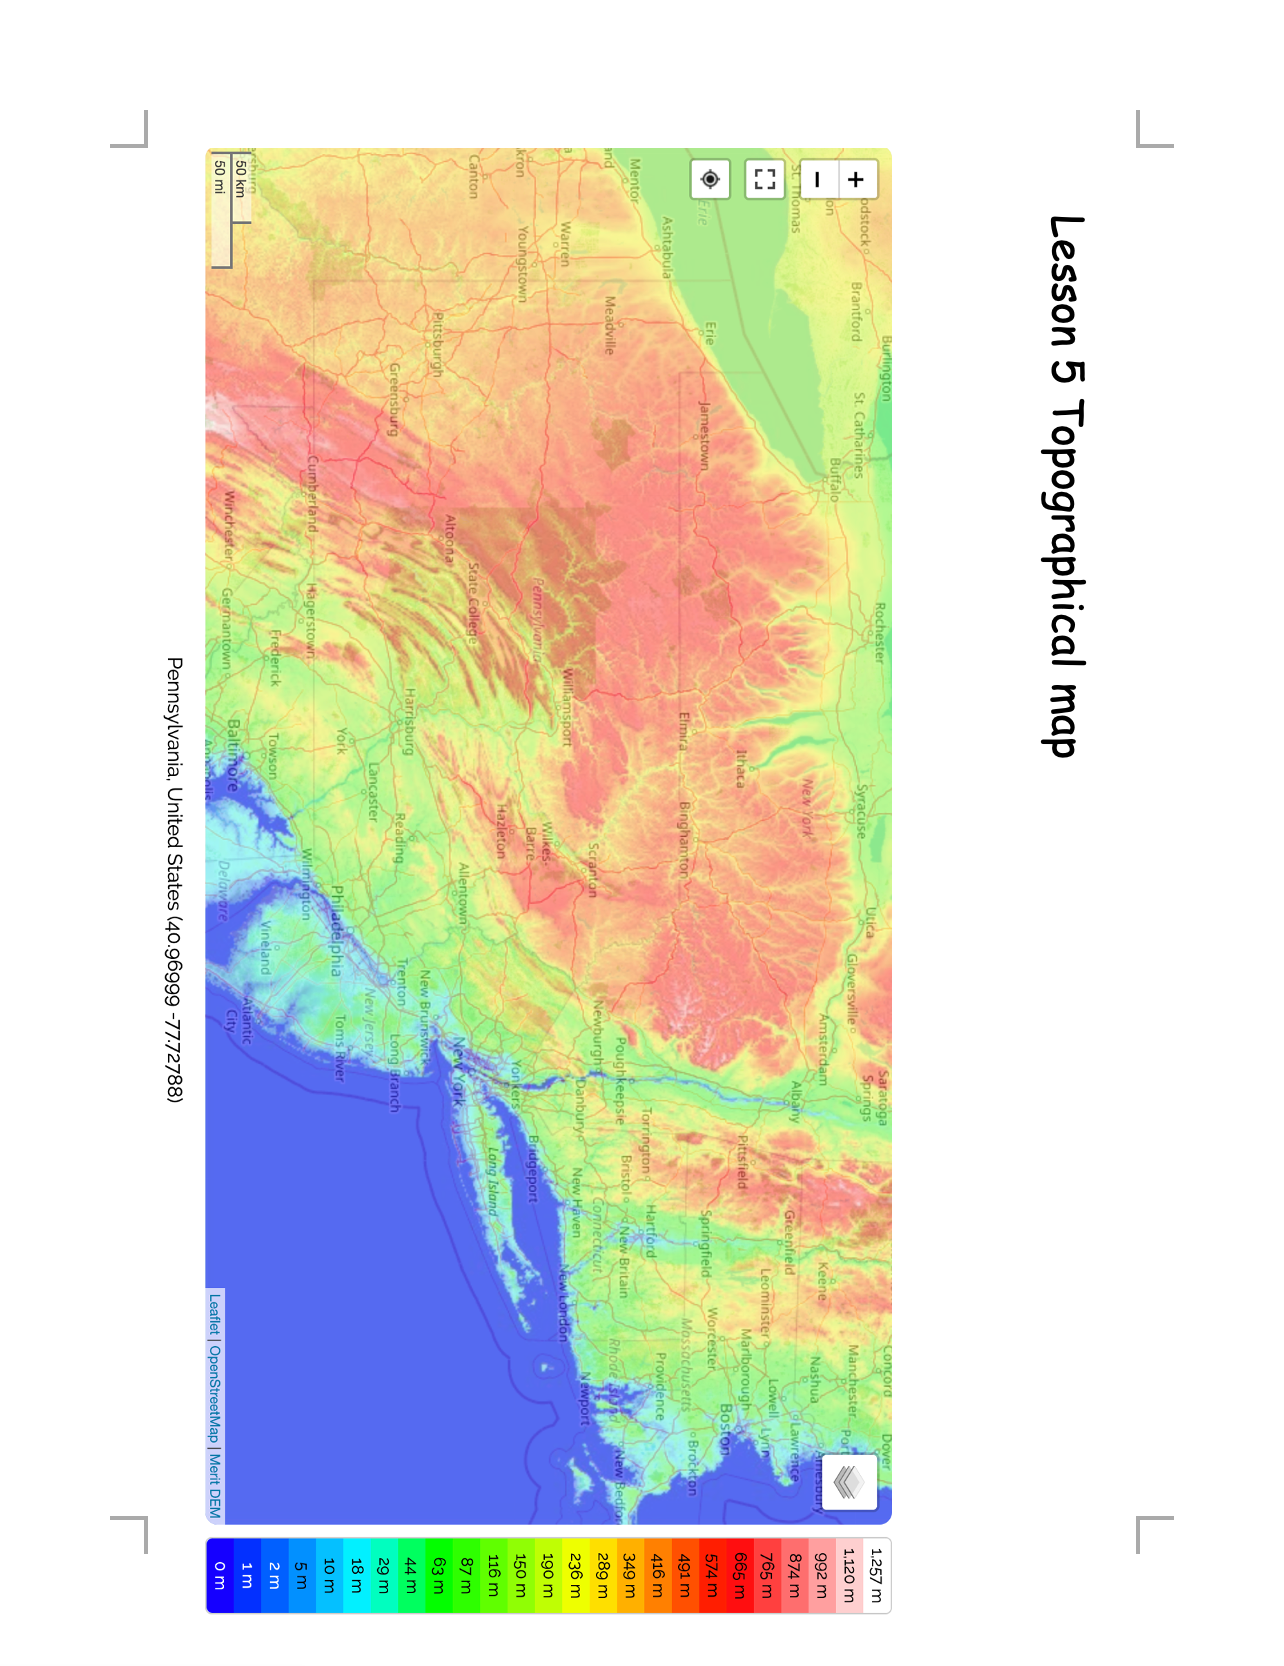
Lesson 5
Lesson 6
Module 3: Water Filtration
Lesson 7
Lesson 8
Lesson 9
Lesson 1 & 2: Lesson 3: Lesson 4: Lesson 5 Lesson 6: Lesson 7 & 8: Lesson 9: