
As we sometimes struggle in America to design mathematics curriculum that will engage students and reach all learning styles, teaching students through manipulatives and play has always been the foundation for engaging young students. This unit seeks to provide lessons for students in fourth grade who are learning more abstract concepts and struggle to fully comprehend these new concepts. The unit can be modified for fifth and sixth graders using more complex designs and deeper discussions around geometric concepts. Included in this unit is background knowledge on the history of paper making and the history of origami. Students will learn about the evolution of origami and the role it can play in teaching students about geometric shapes, lines, and symmetry. Embedded in the lessons is the opportunity for students to practice precision, perseverance, and following step- by-step instructions. These skills will be useful for students as they persevere in solving future complex mathematical problems.
Mathematics for elementary students has been changing dramatically for the last 20 years. Gone are the days where students in first through fifth grades learn addition, subtraction, multiplication and division with fractions and decimals thrown in by fifth grade. Students were asked to memorize their multiplication tables, quickly add and subtract double-digit numbers without using their fingers, and complete long division problems using prescribed steps. For better or for worse, curriculum gurus developed a spiral type of learning that includes addition, subtraction, multiplication, division, fractions, decimals, algebra, geometry, complex and multi-step word problems and higher order thinking skills. The idea is that students will be introduced to each type of mathematics from Kindergarten through Sixth grade. Each grade year, students will learn and be able to apply deeper and more complex strategies to solve problems. The goal is by Sixth grade for students to be exposed to and understand the complex nature of mathematics. Some educators feel that this is great because the United States has fallen behind in terms of math test scores throughout the world, while other educators worry that students in this new curriculum never get a chance to master anything. Whichever school of thought you may lean towards, I believe this new curriculum is here to stay, at least in the foreseeable future. The School District of Philadelphia recently purchased new math curriculum from Pearson called enVisionmath. It uses the same “spiral” learning as Chicago math introduced years ago. Our students struggle with this curriculum because 1) it assumes fourth graders have been using envision math for their elementary years and 2) it includes very abstract concepts and skills for students who are not developmentally equipped to solve complex, multi-step problems when they have not mastered their addition, subtraction, and multiplication skills. Let me be clear – students understand for the most part how to add and subtract up to double and triple digits. They understand that multiplying means to add groups of numbers. What they do not have is the hours of focus and practice it takes to 1) have number sense in which, for instance, students see immediately that 345 + 135 cannot equal 4, 080 and 2) memorize their multiplication facts so that dividing and multiplying fractions become skills they can succeed in.
I currently teach fourth graders in North Philadelphia. My student population is made up of 27% African American, 63% Hispanic/Latino, 3% White, 1% Asian, and 6% Multi Racial/Other. We are a Title I school with 100% recorded as economically disadvantaged. My students have a difficult time focusing on their lessons, completing home and school work, and self-monitoring their behavior. I find when teaching math that my students get upset when presented with new concepts that assume they have mastered basic math skills. Our curriculum also assumes students have prior experience with the curriculum (it is our second year using this curriculum) and have been successful. I find that many times, my students do not know what to ask when they do not understand a concept. It seems that most do not have the basic terminology to articulate questions they have about the math concepts are learning. Have you ever seen students making fortune-tellers in your classroom? Students in my class this year make them all the time. I introduced an “origami book,” which is a fun way to organize information about non-fiction texts. Now I find my students making 3-D shapes in the classroom such as boxes and shapes that involve several pieces of paper locked together like a pinwheel. Geometry can be fun and engaging for elementary students. Identifying shapes, understanding angles and degrees of a circle, identifying triangles, etc. give students a break from the usual adding, subtracting, multiplying and dividing. For our students in the Philadelphia School District, providing additional practice and hands on activities will give them a chance to play with these concepts and hopefully gain a deeper understanding. Norma Boakes wrote that spatial visualization is needed if students are going to understand shapes and structures; they need to spend time exploring and developing their spatial skills. One way to do this is through origami. Origami involves a student “following a construction process moving a two-dimensional square into a variety of three-dimensional shapes and figures.” (Boakes 2) This unit uses the idea of engaging students by uses a simple manipulative – paper. Students will be able to create shapes, both two and three-dimensional to develop an understanding of symmetry, angles, fractions, and measurement. Using paper, a manipulative, that students can work and practice with, will help them to better grasp concepts such as measuring the degrees of a circle. Designing problems and projects around geometric concepts will help students to better understand these abstract concepts.
Brief History of Paper There are a few books out that look at history through objects or food. It is a fascinating way to chart history through time without necessarily charting wars and battles. Mark Kurlansky has written a few of these. Salt: A World History, Cod: A Biography of the Fish that Changed the World, The Big Oyster: History on the Half Shell, and Milk! and A 10,000-Year Food Fracas are just a few of his books that look at the history of these items and how the need, distribution, sale, use, and quest for them have changed the world. Paper: Paging Through History was also written by Kurlansky in 2016. Paper as we know and use it today is a relatively new technology. Paper satisfied a need in society – a need to record information. As governments grew and changed and as businesses and trade grew and changed, the need to record and keep records of transactions and laws became important. Kurlansky wrote that the Chinese invented papermaking. That is not to say that a type or form of paper was not being used in other parts of the world around the same time. Evidence shows that people were writing on materials such as clay, stone, papyrus and parchment. At one point, the mark of an advanced civilization was one that made paper. As paper became the cheaper option (much cheaper that papyrus, a water plant, which could only be grown along the Nile and parchment, which is made from the skins of sheep, goats, etc.), its use spread throughout the world. As merchants from the East traveled throughout Asia, paper was traded and eventually paper mills grew around the world changing the economy of those towns that settled near a good source of running water. Because papyrus was unique to Egypt, it became a valuable commercial product that was shipped throughout the world. The papyrus reed was peeled and once the outer layer was removed, there were about twenty inner layers that would be unrolled and laid out flat. The layers were “woven” together, the second set laid at a 90-degree angle from the first set underneath. Water was used to moisten the sheets and then they were pressed together with weights for a few hours. The reeds, when cut, had a sticky sap that served as the glue that kept the layers together and if needed, a flour paste was used. The sheets were then rubbed with a stone, piece of ivory, or shell until they were smooth and the layers did not create grooves that a stylus could move across the sheet. Parchment was made from the skins of sheep, goats, and cows. Vellum, a finer quality of parchment, was made from the skins of calves. The process was tedious: after being flayed, the skin is soaked in water for a day. The skin was soaked in a dehairing liquid, which eventually included lime, for eight days. It had to be stirred a couple of times a day and you had to be careful not to soak the skin too long because it weakened the skin. Next it was stretched out on a stretching frame by wrapping small, smooth rocks in the skins with rope or leather strips. The skin would be scraped to remove the last of the hair and get the skin the right thickness. Paper is made by “breaking wood or fabric down into its cellulose fibers, diluting them with water, and passing the resulting liquid over a screen so that it randomly weaves and forms a sheet.” (Kurlansky xv) Different trees and plants were used to make paper so through the last two to three centuries, paper has evolved from a thicker, coarser paper to the thin, smooth paper that we use today. Paper was slow to become popular in Europe, it was felt that important and religious books should be written on parchment because they would last longer than books made of paper. Making paper was not necessarily easier or faster than making papyrus or parchment. In fourteenth century Europe, papermaking was common and wherever there was a river with clean water, a downhill run or swift moving current, and a town of people who could provide rags, there was a paper mill. As the need for paper grew, workers, who did not have fixed hours, might work all night. Apprentice paper workers, or children, “who were small enough to crawl into vats, scrubbed the hammers and the equipment clean” during the night when the mill was closed. (Kurlansky 96) With our new digital technologies, one might think that paper is seeing its last days. Kurlansky would agree that paper might not be here forever. But he does feel it is more secure than electronic messages. “Electronic messages can be hacked, accessed and reconstructed.” (Kurlansky 334) If origami continues to be popular and used in education, health care and science, then paper will continue being manufactured in the future. Timeline To give a perspective of how paper has evolved to today, here is a timeline of major events known throughout history taken from Paper: Paging Through History: 3000 BCE Oldest papyrus found – a blank scroll in a tomb at Saqquara, near Cairo 500 BCE Chinese begin writing on silk 252 BCE Dating of the oldest piece of paper ever found in Lu Lan, China 105 BCE Cai Lun of the Chinese Han court is credited with inventing paper 256 CE First known book on paper produced in China 500-600 CE Mayans develop bark paper 610 CE Korean monk takes papermaking to Japan 751 CE Papermaking in Samarkand begins – they are credited for producing high quality paper exclusively from (linen) rags 1264 CE First record of papermaking in Fabriano, Italy – they are credited with first using watermarks to identify the papermaker. 1309 CE Paper is first used in England. 1495 CE John Tate establishes the first paper mill in England in Hertfordshire. 1502-20 CE Aztec tribute book lists forty-two papermaking centers. Some villages produce half a million sheets of paper annually. 1575 CE Spanish build the first paper mill in Mexico. 1729 CE Papermaking in Massachusetts begins. 1833 CE An English patent is granted for making paper from wood. 1863 CE American papermakers start using wood pulp. (Kurlansky 337 – 3446) History of Origami The word origami comes from the ori- meaning, folded and –kami meaning, paper. Although the Chinese developed papermaking, the Japanese developed the art of origami. The first Japanese folds date from the 6th Century A.D. Since paper was scare and precious at that time, the use of origami was limited to ceremonial occasions. The designs were limited to representations of animals, people, and ceremonial designs. The designs were passed down from generation to generation, usually from mother to daughter. Some of the oldest existing directions for paper folding were printed in Japan in 1797, entitled Sembazuru Orikata or Folding of 1000 Cranes. You may be familiar with the story of the young Japanese girl, who contracted leukemia after World War II from the effects of the Hiroshima atomic blast. The crane is a symbol of good luck in Japan and the tradition was that if you fold 1,000 cranes, you would be granted one wish. Young Sadako Sasaki decided to fold 1,000 cranes so that her wish to get better would be granted. She died before achieving her goal, 365 short. After she died, her classmates folded the rest for her and placed them in her coffin. Akira Yoshizawa is credited with making origami popular again. He was born to dairy farmers on March 14, 1911 in Japan. When he was 13, he had to take a job in a factory in Tokyo. In his early 20s, he was promoted to “technical draftsman,” responsible for teaching new employees basic geometry. He had learned origami as a child so decided to use it as a tool to help these employees understand geometry. Yoshizawa quit his job in 1937 to practice origami full time. He lived in poverty for close to twenty years and during World War II, he served in the army medical corps. To cheer up the sick patients, he made origami models but eventually became sick himself and was sent home. Finally in 1951, a Japanese magazine asked him to fold the twelve signs of the Japanese zodiac. This exposure basically led to his fame. In 1954, he founded the International Origami Centre in Tokyo and through his travels became a goodwill ambassador for Japan. He died in 2005 at the age of 94. In the 1960s, two origami societies were established: The Friends of the Origami Center of America and the British Origami Society. With the resurgence of interest in origami, it has evolved into different forms including modular folds, three-dimensional folds, folds that combine several subjects into a single fold, action figures, and figures that move when tugged. I believe that one reason that origami has become so popular and so many new ways to fold paper have become popular is because of the variety of paper that is manufactured today. I cannot imagine making action figures or modular folds with the coarse, thicker paper that was made years ago. It is with new technologies and materials that our paper today can be as think or thick as we desire. Origami paper can be purchased in square shapes with different colors or patterns on either side to make folding paper much easier and more precise than in times past. Today, the concept of paper folding has also been used in health care, i.e. cardiac stents, and science, folding lenses to fit into spacecrafts that can be remoting unfolded once in space. Science and technology has taken the concept of paper folding and used it to fold different materials such as plastic and metals to advance our ability to save a life or see farther into the universe. Basics of Origami Origami is the art of folding an uncut sheet of paper into an object and animal. Yoshizawa invented a systematic code of dots, dashes, and arrows that was adopted by western authors Harbin and Randlett in the early 1960s, which is still used today. This standardized the techniques and terminology of folds that people around the world use – if you know the system, you can recreate the design even if the book is written in a different language. The following general rules are given when creating an origami design: students should work on a hard, smooth, and flat surface so that their folds can be accurate, it is important that each fold and crease be precise and that a pencil or thumbnail is used to move over the fold for exactness, study the diagram/instructions before folding the paper, and if students use colored paper, start with the colored side facing down at the beginning of their folding. This system includes instructions using lines, arrows, and terms used to describe these series of lines and arrows. There are five different types of lines: paper edges, either raw or folded, are drawn with a solid line. Creases are drawn as a thinner line and will often end before the edge of the paper. Valley folds are drawn with a dashed line and mountain folds by a chain of dot-dot-dash line. The X-ray line or dotted line when shown on a drawing indicates anything hidden behind other layers or represents a hidden edge, fold, or arrow. (Lang 2003, 15). (Math in Motion, Pearl 41) Geometry and Origami Using origami to introduce more complex abstract concepts to elementary students is a way to allow students to comprehend shapes and angles. We may think that all students understand that a square has four sides of the same length and four right angles, but I have seen the Ah-ha! Moments some fourth graders have when they make one from an 8 ½ by 11” sheet of paper. Using folds or creases; students can create triangles, such as equilateral triangles. Here again, do students really understand what an equilateral triangle is? They will after completing an activity where they are asked to create one from a square. Thomas Hull wrote in Project Origami: Activities for Exploring Mathematics that “…when choosing to use origami as a vehicle for more organized mathematics instruction, an easy choice is to let the students discover things for themselves.” (Hull xi). Origami is a great strategy to use to help students discover properties of two-dimensional shapes. Students can create hexagons, octagons, and nonagons by using origami. Students in fourth grade have a difficult time understanding angles. They see two rays coming together at a point. They are shown a protractor and shown how to measure the angle created by the two rays. Students spend time practicing these measurements with their protractors and terms such as right, acute, obtuse angles. One way to help students to grasp these concepts and discuss where we use geometry in the world would be use a square sheet of paper is to point that one corner is a right angle and by making creases (folding) the paper, they can create different acute angles. Students can also fold a square making two creases that intersect at the middle of the square. A circle can be drawn around the intersecting point so that students can see when we divide a square into four sections, we are creating four right angles each representing 90 degrees or a right angle. If we multiply 90 times 4, we get a product of 360 degrees, which represents the total degrees of a circle. Geometry terms such as lines, points, angles, triangles, rectangles, etc. can be modeled and discussed as part of an origami lesson. Asking students to identify these terms and create them will support students who are visual learners. Another concept that can be modeled is patterning. Students will be able to create patterns through paper folding, especially when creating three-dimensional shapes.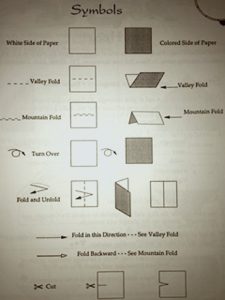
Developing authentic mathematical experiences for students is the best way to engage students and provide practice with abstract concepts. Students will have an opportunity to answer questions and problems using origami. For example, students will begin by folding two-dimensional four sided shapes into three to eight sided shapes. They will discuss what they notice about constructing these shapes. They will discuss what patterns they notice in the line creases they create when constructing each shape and what this tells them about the shape itself. Teaching origami can seem daunting when you have a classroom of thirty plus students. Folding paper into smaller and smaller shapes will be difficult for students to see. Some will need one-on-one modeling while others will need to see the folds up close. One strategy I will use to accommodate students is to use a document camera while identifying math concepts and terms and while constructing two and three-dimensional shapes. Document cameras are a great way to model step-by-step instructions that will allow students to follow along. Another strategy that I would like to try is to choose four to five students the meet with before beginning the unit. I was thinking I would create an “origami club” where these students and I would meet once a week during lunch and construct origami shapes and become experts in creating the two and three dimensional shapes that we will be doing in class during the unit. After presenting the lesson with the whole class, discussing concepts and modeling the origami shape, the experts along with the teacher will go around and assist the students who are struggling to construct the shape. Another strategy that I would incorporate is for students to write reflections about their process. After finishing an origami shape, students will be given prompts to reflect on in their “origami journal.” Using mathematical terminology, students will be asked questions such as, what shapes did you notice when you unfolded your paper (creases in the unfolded paper will have different shapes). What shapes do you notice in your finished three-dimensional shape? What angles did you find when you unfolded your shape? How many times did you have to unfold your paper and start again? What part of making this shape was the most difficult? Why? Integrating writing with our lessons is important because students are asked to explain their answers in math. Students can use the practice of writing about their thinking and learning in this unit as well. Finally, to assess students’ understanding of the geometric terms and origami skills, I would use Exit Slips for each lesson. Think of what you would like students to learn, for example, in the first lesson, using half sheets of paper, ask students to make two isosceles triangles and label the right angle. For lesson two, ask students to define and draw horizontal and vertical lines.
These lesson plans are designed for fourth graders and can be modified to use for other grades. By choosing other shapes and designs in the books under Teacher Resources, teachers in third, fifth, and even sixth grade can use these lesson plans. I designed these lessons to be used for a period of five to ten days using days eight through ten as “enrichment” lessons where students can learn more complex designs found in the aforementioned books. I found once I taught the first lesson on the history of origami and the basic terms, students couldn’t wait to create shapes and designs. These lessons could be spread throughout a quarter as well. You could designate Fridays for seven weeks, for instance, as “Origami and Math Day” to complete this unit. The benefit of doing this is that students are given a week to practice their origami skills. By introducing and reviewing geometric concepts each lesson, students gain a deeper understanding of abstract concepts. You can extend the enrichment lessons for as long as you like throughout the year. There are books in the resources that give many complex and fun designs to make. I recommend that you choose three to four students who you know would love to have the role as “experts” for your lessons. Meet with them for approximately fifteen minutes before each lesson, which is easier to do when teaching one lesson per week, and show them your next lesson. Allow them time to practice by giving them paper to take home. They will be great assets in assuring the success of your lessons as they walk around the room helping those who are struggling to complete the shape or design. Finally, you will have to practice completing each one of these designs before teaching the lesson. It will take some time to master the more complex shapes and designs. Since each lesson includes modeling with a document camera, the more expert you are, the smoother the lesson will go. Using origami paper while modeling is also helpful as the two sides, colored side and white, are easily seen on the Smart board. Objective: Students will be able to identify squares, rectangles, and isosceles triangles in order to create an origami shape. Materials: Vocabulary: Procedures: Objective: Students will be able to use a square sheet of paper to create a 3-dimensional pinwheel. Materials: Vocabulary: Procedures: Objective: Students will be able to use origami procedures to create a moving 3-dimensional shape. Materials: Vocabulary: Procedures: Exit Slip-students will draw perpendicular lines, intersecting lines, and line segments.Lesson One: History of Origami and basic terms
Lesson Two: Geometric Shapes
Lesson Three: Jumping Frog
[Please see PDF above for additional activities & appendices]
The following represent Pennsylvania standards for fourth graders: CC.2.3.4.A.2 Classify two-dimensional figures by properties of their lines and angles. CC.2.3.4.A.3 Recognize symmetric shapes and draw lines of symmetry. CC.1.5.4.A Engage effectively in a range of collaborative discussions on grade-level topics and texts, building on others’ ideas and expressing their own clearly.
Boakes, Norma. “The Impact of Origami-Mathematics Lessons on Achievement and Spatial Ability of Middle-School Students.” Origami 4, May 2009, pp. 471–481., doi:10.1201/b10653-46. This article discusses ways to use origami in the mathematics classroom. Ideas are given to educators and results of studies completed on the spatial ability of middle school students. Hull, T. (2006). Project Origami: Ideas for Exploring Mathematics. Wellesley, PA: A.K. Peters. This is a technical book for teachers who are looking for more complex origami designs along with ideas for math lessons for older students. There are many suggestions for lessons plans and essential questions for students to write their reflections. Kurlansky, M. (2016). Paper: Paging through history. New York: W.W. Norton & Company. This book presents the history of paper tracing the origin of paper from papyrus, silk, and animal skins to paper making in early America. The author presents background information on how the idea of writing on different types of paper evolved throughout time. Lang, R. J., & Macey, R. (1988). The complete book of origami: Step-by-step instructions in over 1000 diagrams: 37 original models. New York: Dover. For teachers who would like more complex designs to make with their students, this book offers 37 complex designs with step-by-step instructions including elephants, scorpions, tarantulas, etc. Lang, R. J. (2003). Origami Design Secrets: Mathematical Methods for an Ancient Art. Natick, MA: A.K. Peters. This book is a comprehensive guide to making complex origami designs. It includes basic instructions, crease patterns, and step-by-step instructions for many animals.